Have you ever heard the saying, “Nature abhors a vacuum”? This idea can be applied to a lot of natural phenomenon. In the North East, Mother Nature just loves to fill up empty areas of disturbed soil with plants. In fact, it’s very uncommon for bare earth to be found in any naturally occurring ecosystem on the island. I often wonder why so much time and effort is spent on applying shredded bark mulch annually to cover the bare soil left in garden beds. Truthfully, living groundcovers do the same job more effectively and for years without any additional input from the gardener.
In full flower
A great groundcover common from the Arctic all the way south to Georgia is Three-toothed Cinquefoil. The leaves of this tough little plant are reminiscent of alpine strawberries, but are evergreen, taking on hues of red in the fall and winter months. Clear white, buttercup-like flowers appear in late spring. This Potentilla is classified as a woody plant, as it does have 3-6″ woody stems.
Plant Potentilla tridentata in sandy or gravelly soils with excellent drainage and little water. It would be quite at home next to native grasses and sedges, like Carex pensylvanica (Pensylvania sedge) or Schizachyrium scoparium (Little Bluestem). Or try planting it as a drift in a more prominent area of the garden that is not irrigated.
Fall color
Note: This plant has recently given it’s own genus and species. The new name is Sibbaldiopsis tridentata.
Scientists estimate that there are 10 quintillion insects on the planet. That’s 10,000,000,000,000,000,000 individual creepy crawlies! And, boy, do they like to eat! From early spring to late winter, it is extremely likely that someone is dining your prized plant’s leaves, stems, or roots.
Control of insects in the garden is a hot button issue. Often times gardeners are tempted to use strong insecticides as soon as they see a single bug. Hell, I’ve been known to grab a spray bottle of Sevin myself from time to time. Luckily, we’ve all gotten much more sensitive to the fact that beneficial insects are also living in and working for us in our gardens. In order to minimize the use of poisonous chemicals and the destruction of beneficial insect populations, it’s extremely helpful to know what kind of insect is causing the damage you see.
When it comes to identifying which insect is causing the problem, there are a few ways to go about it. The first is to research the plant where most of the damage is occurring. Many plants are susceptible to particular buggies. Those plants can become infested with hundreds of insects of a single type. For example, roses are well-know to harbor aphids. Every year at the nursery, I fully expect to see them by June, and begin to check all the roses for this pest. I’ve researched many different ways of killing them, but I most often use an organic method that I was taught years ago. I just put on a gardening glove and squish them! Since most of the aphids cluster on the tips of the new growth, I can easily murder 90% of the population in one go. A second squish-a-thon a week later, and the population is at such a low level that’s it hard to notice any further damage.
The second way to determine what is eating your plant is by studying the damage itself. My favorite “Bug Book” is Garden Insects of North America, by Whitney Cranshaw. This book breaks down the feeding patterns of insects into 9 categories, and gives a very extensive list with great pictures.
Keeping roses as the example, I noticed a number of holes in the leaves of some ‘New Dawn’ roses recently. I open up my trusty Garden Insects of North America and turn to Chapter Three, “Leaf Chewers”. Unfortunately, I have not seen the actual insect feeding on the leaves, so I can’t really settle on a specific pest yet. I flip to another great book in my library, The Organic Gardener’s Handbook of Natural Insect and Disease Control by Barbara Ellis and Fern Marshall Bradley, to see what insects commonly cause this kind of damage on roses. Now it becomes process of illumination. I know it’s not Japanese Beetles, because they are large, and feed during the day – I would have seen them, and the damage would have been more serious. I also rule out large caterpillars, because they also feed during the day, and leave behind noticeable droppings, which I should have seen clearly.
It’s likely that the damage on these leaves is some sort of sawfly larvae or rose chafer. Most of these leaf-eaters are already done feeding for the season, and should not cause further damage. So, in this case, I will wait until next June, and begin to pay very close attention to the leaves. At the first sign of the pest, I will apply an appropriate insecticide.
For photos of some common insects and the damage they cause on plants, check out our pinterest page:
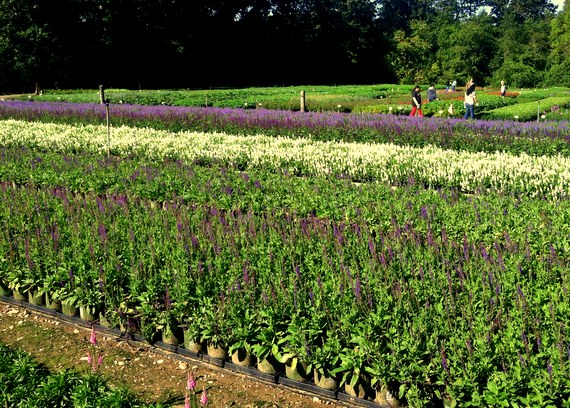
We sell hundreds of salvia plants each year, and with good reason. Meadow sage is a dependable perennial plant that comes back year after year. Their spikes of purple, blue or white flowers shoot up from the foliage in early summer, lasting for more than a month. The rabbits don’t seem to touch them, and deer mostly
leave them alone because of their pungent smell and slightly hairy leaves.
Plant them in average, well-drained soil in a sunny spot. Care is also easy: after the frost, cut down the wizened foliage. To keep the plant looking fresh all season, cut the spent flower spikes back to the basal foliage in mid-summer. Many cultivars will reward the gardener with a second flush of bloom.
During our recent trip to Connecticut to visit one of our growers, I was excited to see fields and fields of Salvia in bloom. It was the perfect opportunity to make a collage comparing them. Their attributes are listed below, along with the collage.
‘Blue Hill’: Dense spikes of true blue flowers. 1.5 – 2′ tall. Blooms June-July.
‘Snow Hill’: White flowers on compact plants. 1.5′ tall. Blooms June-July.
‘Marcus’: Deep blue flowers on dwarf plants. 8-12″ tall. Blooms a week or more after other cultivars.
‘East Friesland’: Deep violet flowers. 1.5′ tall. Blooms June-July
One of the highlights of last week for Britt and I was a visit to several of our purveyors off-island. After a long summer of selling plants here at Surfing Hydrangea, it was a real treat to take a business trip. With over thirty years combined experience in the green industry, we still find a trip to see our growers valuable and interesting.
Our first day was spent with a morning of travel and a visit to a grower with a vast series of fields and green houses. Literally thousands of cultivars of annuals perennials, shrubs, grasses and trees were neatly row-ed up in groups at various stages of growth. We were told they have over 40 miles of cover able green houses! I was particularly taken aback by the hydrangeas. We sell a great deal of hydrangeas each year, and at times I feel like I am swimming in mop-heads and floating on a sea of panicles. But I was stunned to see thousands upon thousands of ‘Endless Summer’ hydrangeas in their customary blue pots.
Perspective. The green industry is huge.
On our second day we visited one of our favorite growers in Franklin, CT. This operation grows the best quality perennials and vines in our region. We walked around fields and fields of flowers in full bloom. I was surprised to see that their largest crop of shade plants were grown outside under a huge stand of oak trees. It reminded me of our little shade section, shaded by a stand of aging pines. Even when growing is more and more mechanized, it’s refreshing to know that low-tech, natural approaches still have a place.
The hectic pace of summer past, and a great visit to our growers behind us, we’re back at Surfing Hydrangea, re-invigorated and ready to power through the fall. Plants are Cool!
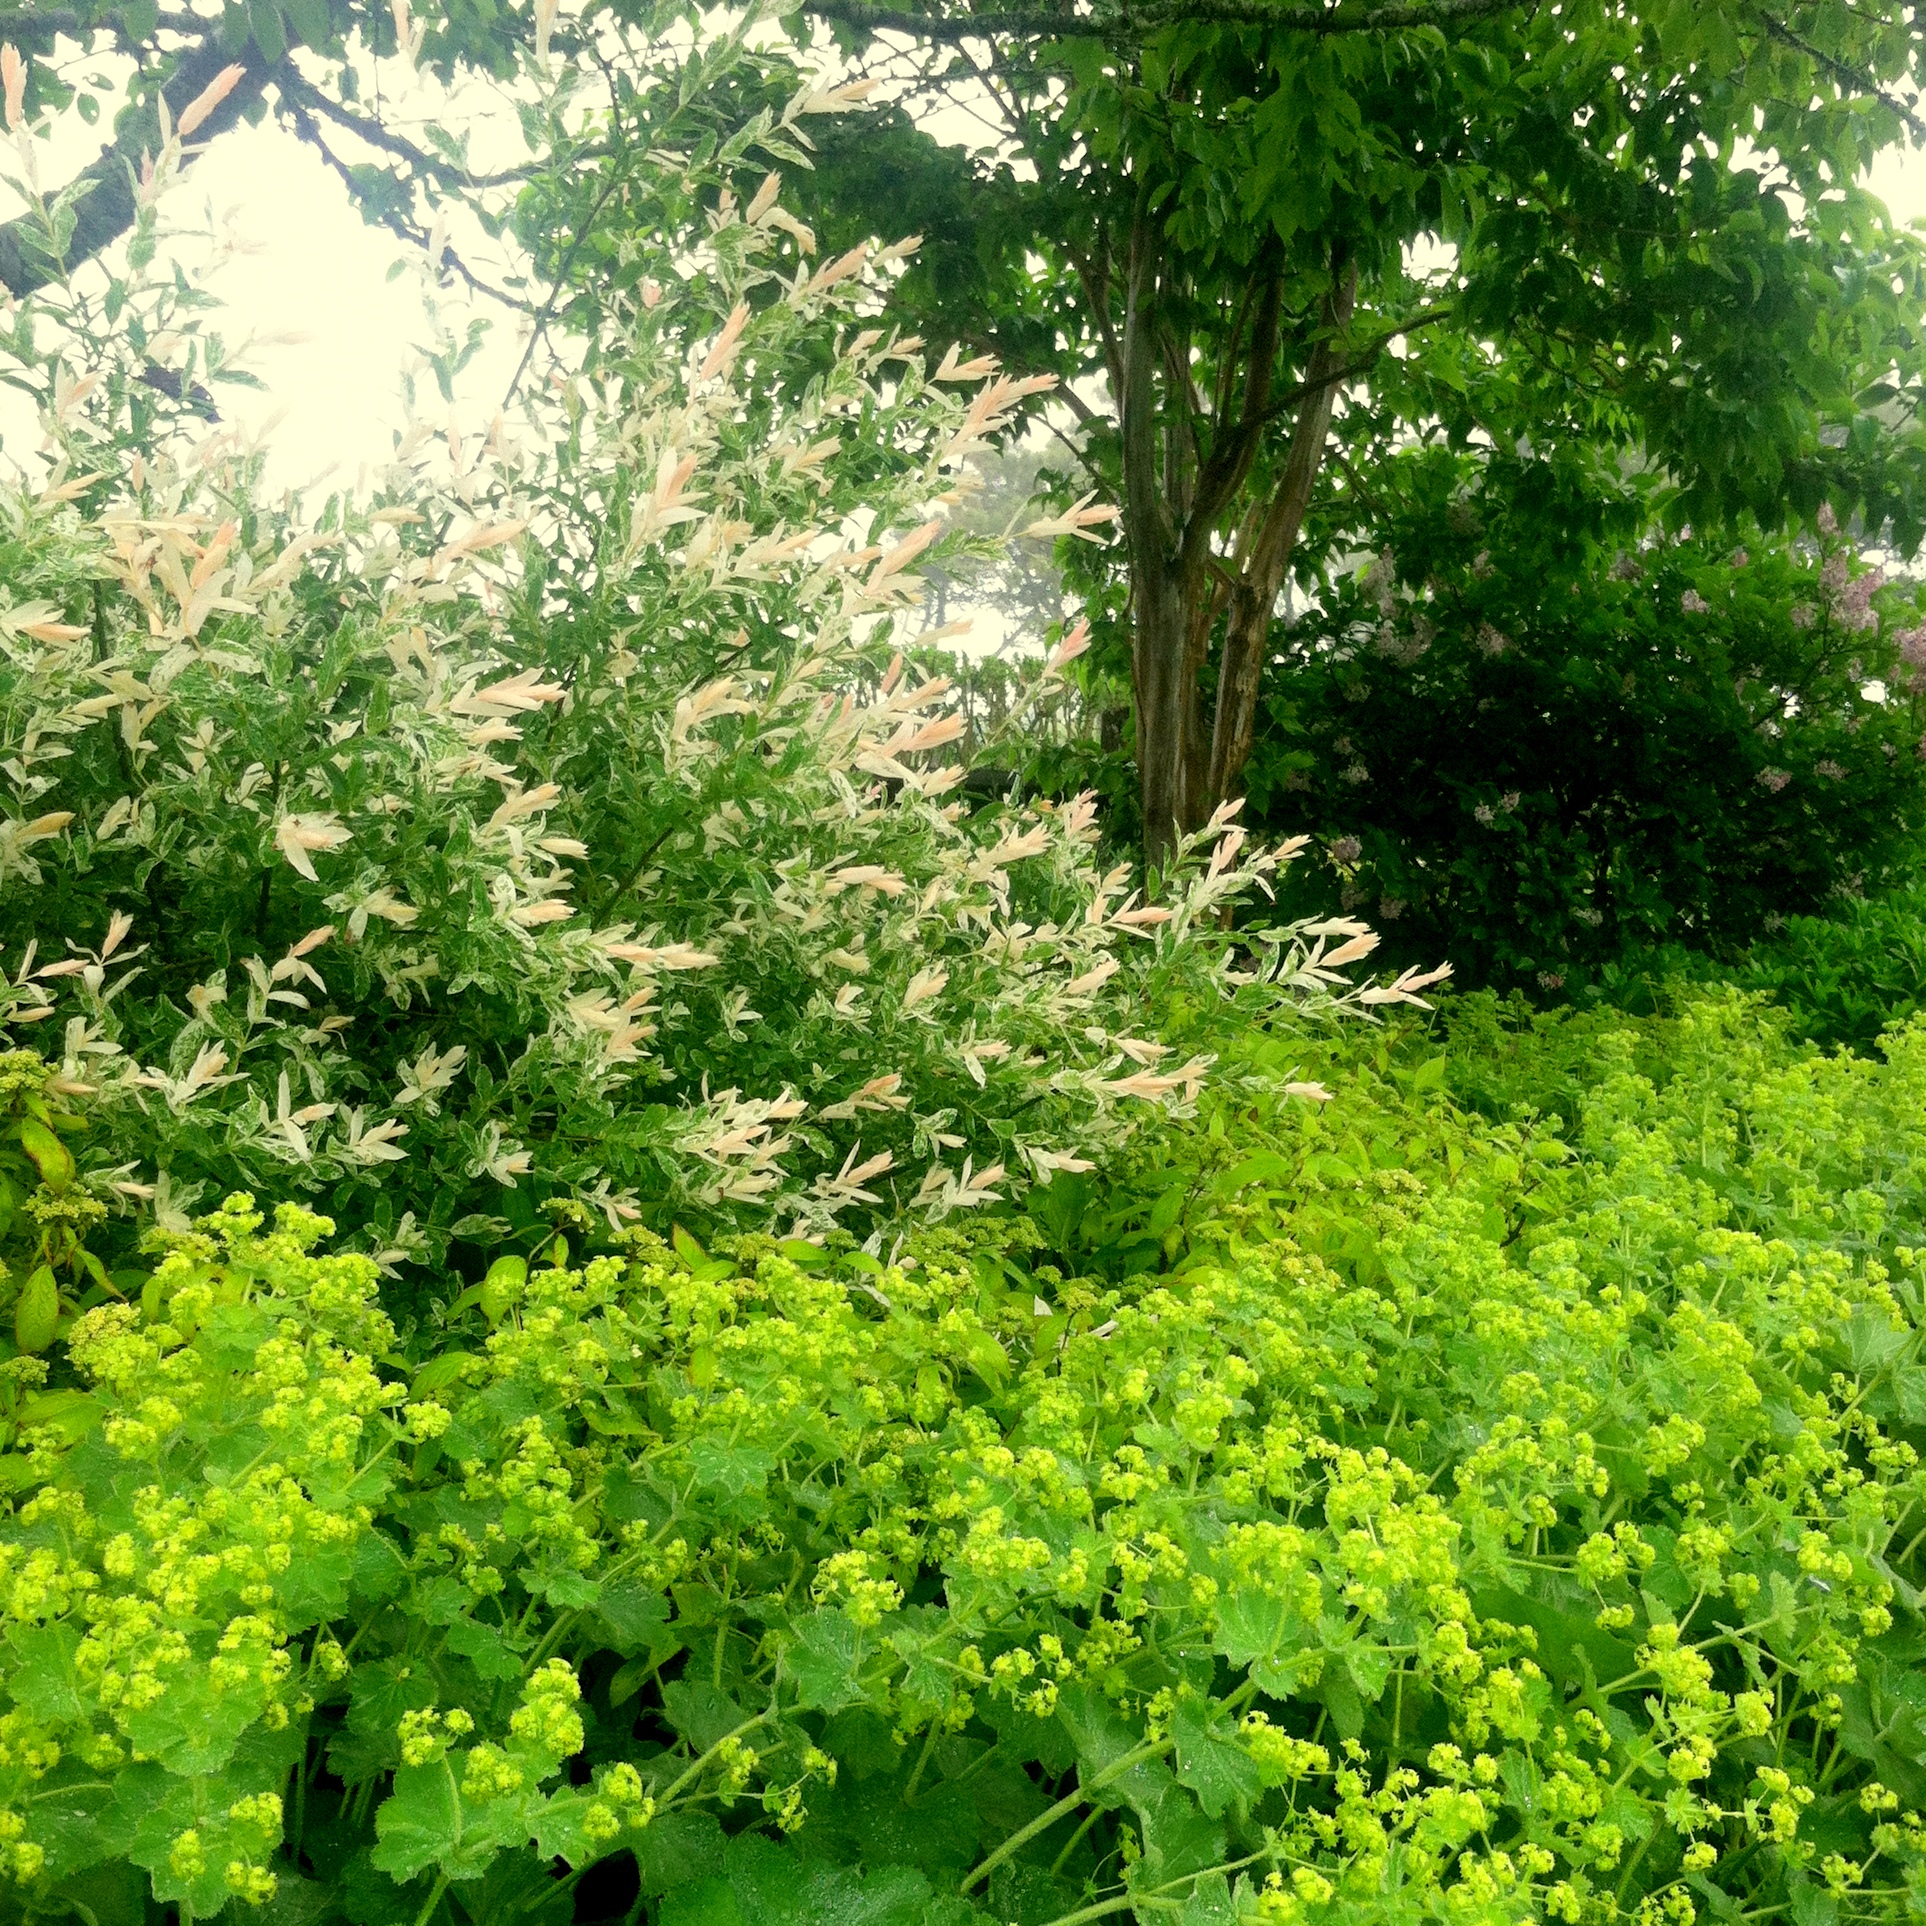
Lady’s Mantle is one of the most common perennials in Nantucket gardens for good reason. These charming plants are incredibly reliable, rabbit and deer resistant and have loads of flower power over a long period. They look spectacular in early summer when the plant is covered in chartreuse-yellow flowers. The tiny star-shaped airy flowers look just as well in a cut flower arrangement as in the garden. When not in flower, the fuzzy
foliage is also lovely. In the morning, the leaves are covered in drops of dew that sparkle in the sun.
These plants blend equally well with sun and shade combinations. Plant them as a low edging along a shady path with ferns as a background or in the front of the perennial border with catmint or small grasses. Alchemilla likes a spot with average soil and even moisture. In my experience, the foliage holds up the best in plantings that have some afternoon shade.
Maintenance is easy. Once the flowers have begun to turn brown, remove them. There are a few ways to do it;either shear back the entire plant, allowing the basal foliage to grow and fill back in, or cut or pull the stalks away from the base of the plant. While dormant, cut back the foliage to the ground.
Some of the most common species and cultivars are listed below:
Alchemilla mollis: The most common species of Lady’s Mantle. Leaves are 6″ wide. Flowers tend to fall toward the outside of the plant when in full bloom, forming a mantle or skirt – hence it’s common name. 18″ tall to 24″ wide.
Alchemilla mollis ‘Thriller’: Slightly larger than the species, possibly with even more flowers. 18-24″ tall and wide.
Alchemilla mollis ‘Auslese’ aka ‘Select’ and ‘Robustica’: A dwarf form. Compact plants hold flowers in a more upright fashion than other Alchemilla mollis cultivars. 12″ tall and 18″ wide.
Alchemilla sericata ‘Gold Strike’: A compact species, 14″ tall. Medium-sized, deeply scalloped leaves. Flowers tend to stay upright.
Alchemilla erythropoda: The smallest species of Alchemilla that is readily available. Perfect for a tiny garden. 6-8″ tall.
Hollyhocks (Alcea rosea) are an old-fashioned staple flower of the cottage garden and a favorite of island gardeners. Stately plants with spires of flowers up to six feet tall grace the back of the border or adorn white picket fences.
Flowers may be single, double, pastel, or saturated, sometimes even bicolor. In perfect growing conditions, they grace the garden for six weeks or more, as flowers open continually up the stalk while the mature ones fade toward the bottom. Because they are biennial plants, during their first growing season they do not flower, rather they form a basal rosette and store energy for the upcoming summer. During the second year, they flower, set seed and die.
Self-seeding is generally sufficient to keep a garden filled with flowers year after year. To be absolutely certain, the nervous gardener will collect seed in September that has ripened on the plant and grow out seedlings right away. Allowing the seedlings to overwinter in a protected area forces the plant into a bloom cycle when growth resumes. Ta Da! Flowers from year to year.
All that said, experienced gardeners already know the DIRTY TRUTH about hollyhocks. Hollyhocks are riddled with disease and insect pests! Rust is Real! Snails are horrible hollyhock eating monsters! If your plants make it to flowering with any leaves at all, INCOMING!!!!! Japanese Beetles cover the plants quickly devouring all that remain! Ok Ok, so you can definitely Sluggo for the slimies, and you can spray insecticide for the avian invaders, but what can you do about rust?
Hollyhock Rust (Puccinia malvacaerum) is a fungal disease effecting leaves and stems of many plants in the Malva family. Rust is NOT avoidable. Fungal spores are present in the soil, on non-host plants and leaf litter. They are tiny and light enough to be blown hundreds of miles from their point of origin. Once the spore lands on a damp hollyhock leaf, it germinates almost immediately, and infiltrates the leaf’s tissue. As the fungus grows inside the leaf it damages the healthy plant cells, weakening the leaf and disrupting photosynthesis. The rust completes its life cycle quickly and causes orange pustules to erupt on the surface of the leaves. Spores are released from these pustules and infect more plants.
Control measures may be helpful, but will not stop the infection from occurring. Be sure to clean up the garden very well in the fall. Making sure there is no residual hollyhock leaf litter that may harbor spores is a good start. Try applying wetable sulfur early in the season, to create an inhospitable environment for the spores to grow in. Continue to spray the plants as new growth emerges. Allow good spacing between plants to speed drying of the leaves after morning dew. When leaves do become infected, remove them. Most importantly, plant tall, late season perennials in front of your hollyhocks to mask their foliage. Phlox works well, as do Montauk daisies.
Russian sage is a fantastic plant for us on Nantucket, having all the qualities we look for in a great perennial:
It’s hardy, overwintering easily without any special coddling needed from the gardener
It performs best in the lean, sandy soil that most of us have on the island.
It’s aromatic grey green foliage has just enough fuzz to make it very deer resistant
It has a long season of interest, looking great from June through October
It flowers for a very long time in mid to late summer, when seasonal residents are on the island.
Its lacy leaves, blue flowers and open habit make it quite versatile in the landscape. It can be added to perennial gardens, makes a dramatic mass planting and pairs extremely well with ornamental grasses.
Although many of us have been taught to leave Russian sage standing and prune it in spring, I’ve also had perfect results pruning it in fall, when I cut down my spent perennials. Just be sure to wait until it is dormant, preferably after a frost.
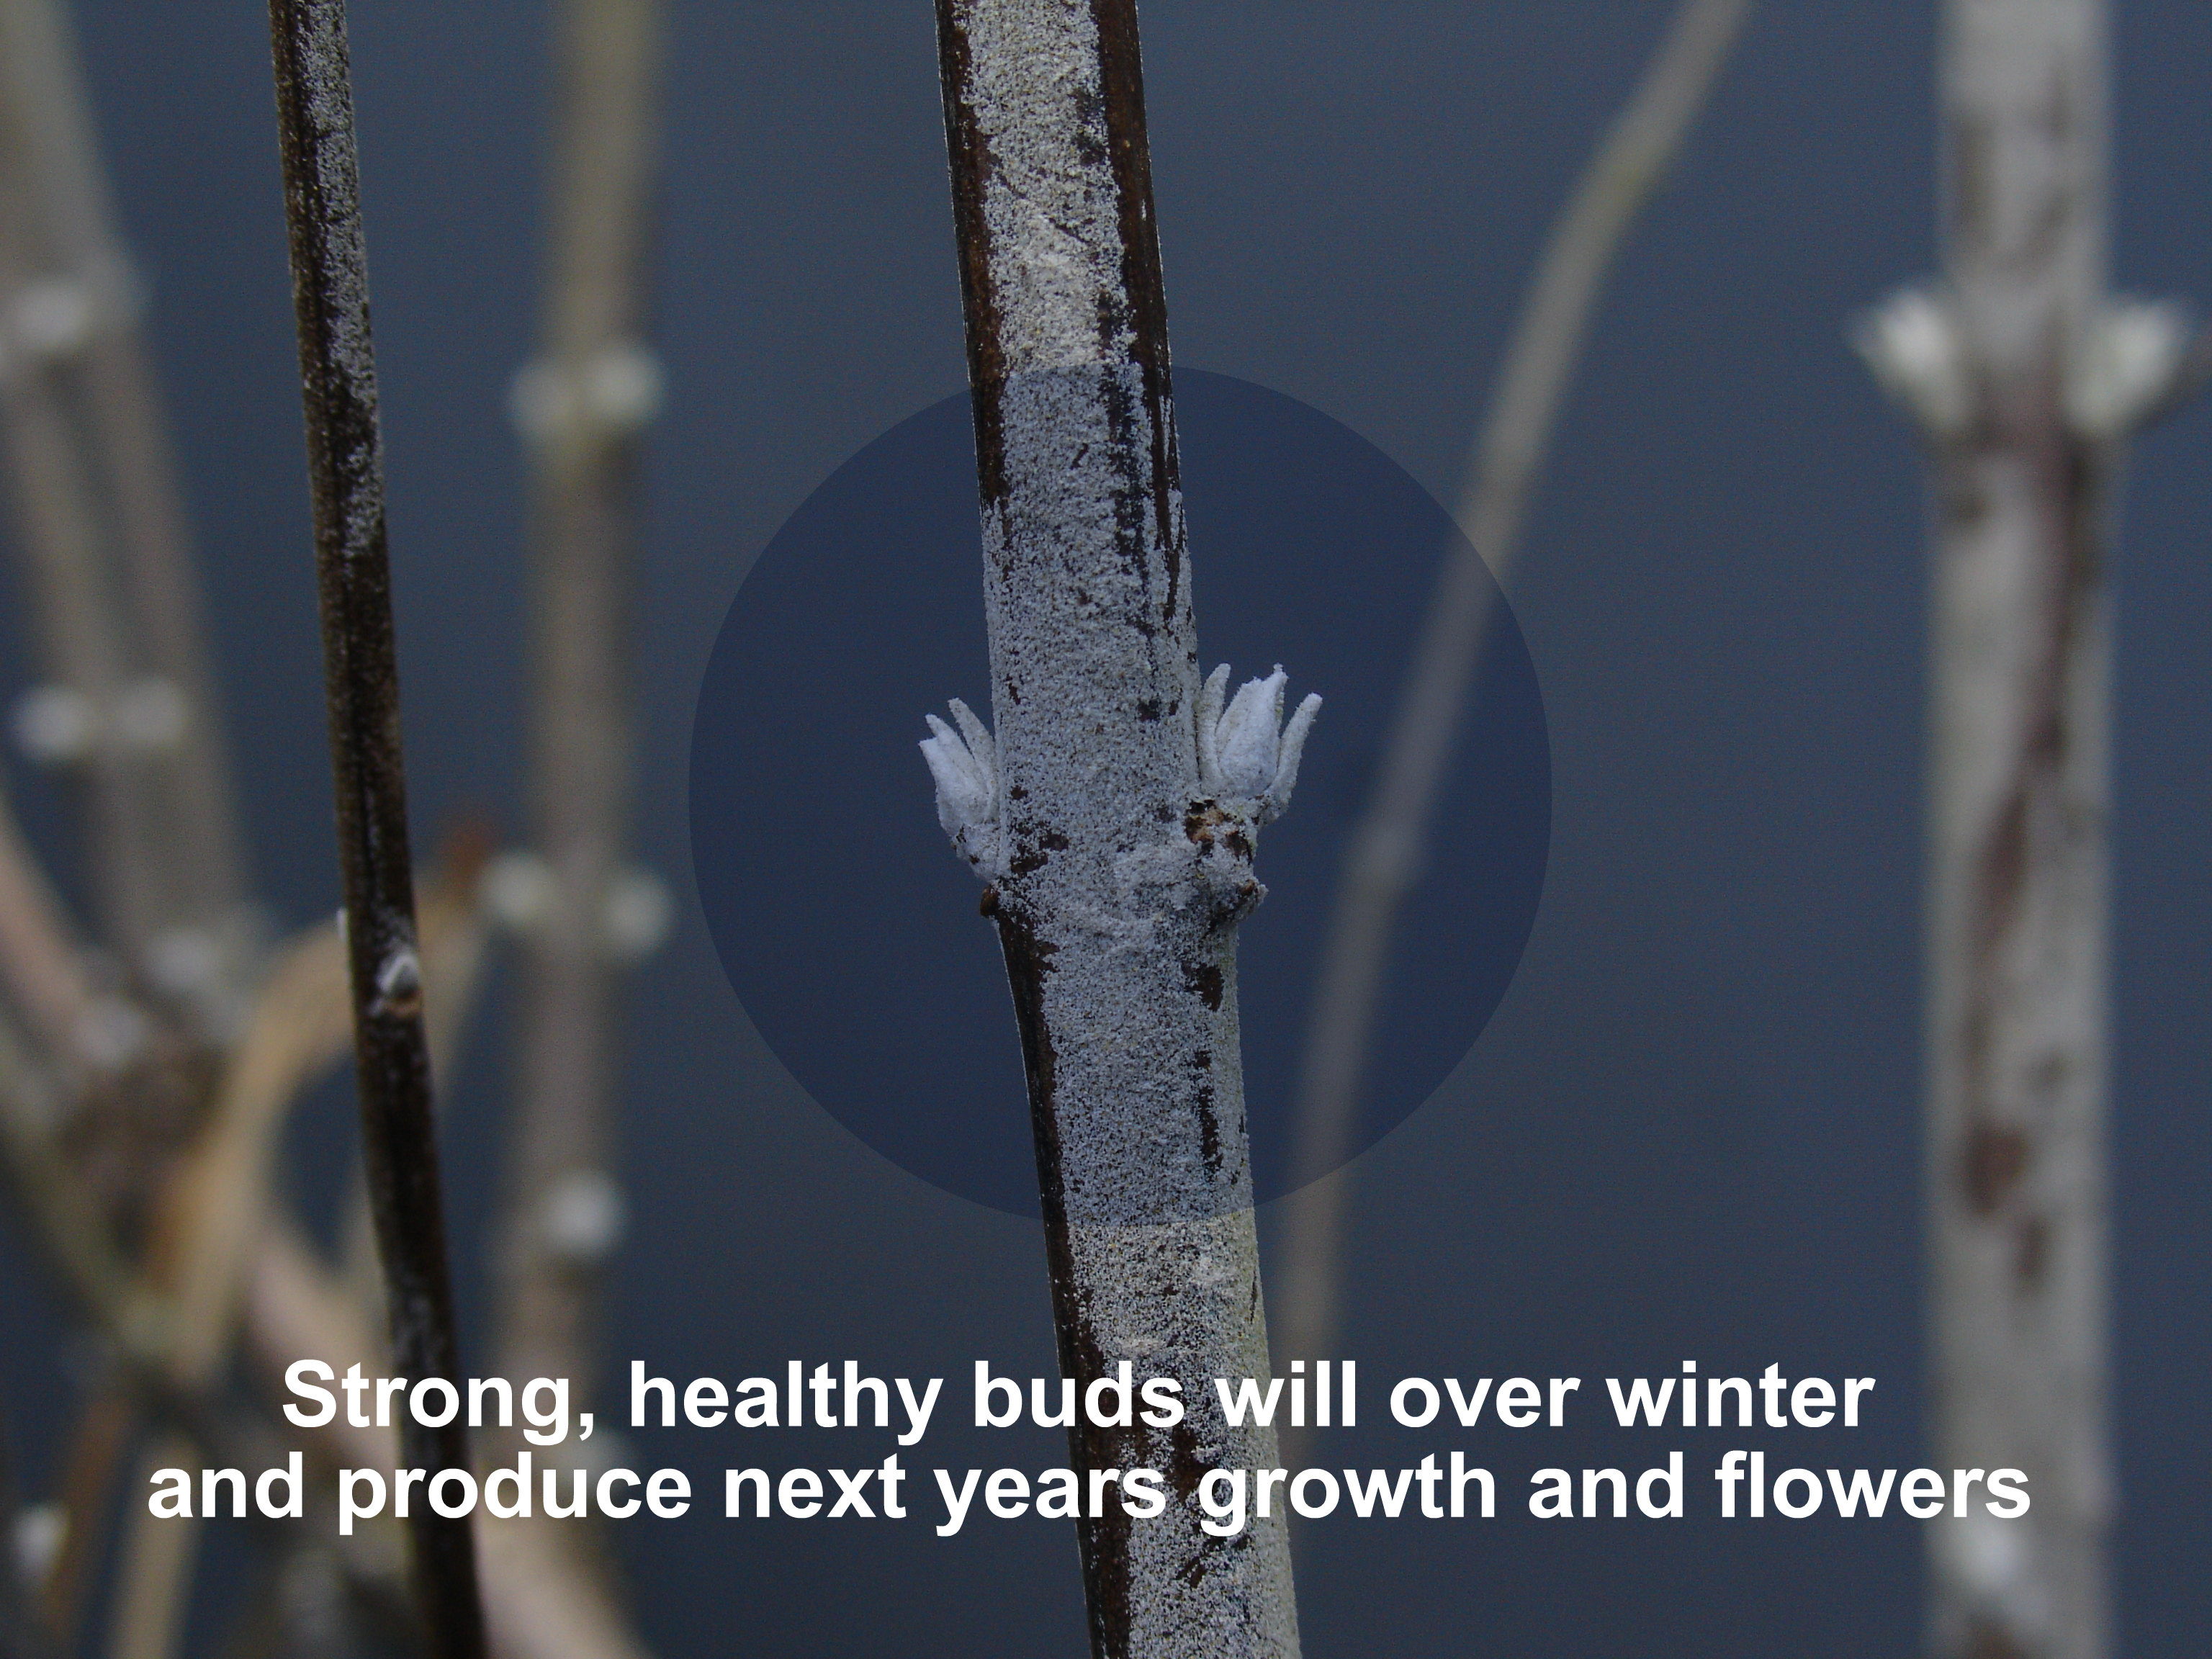
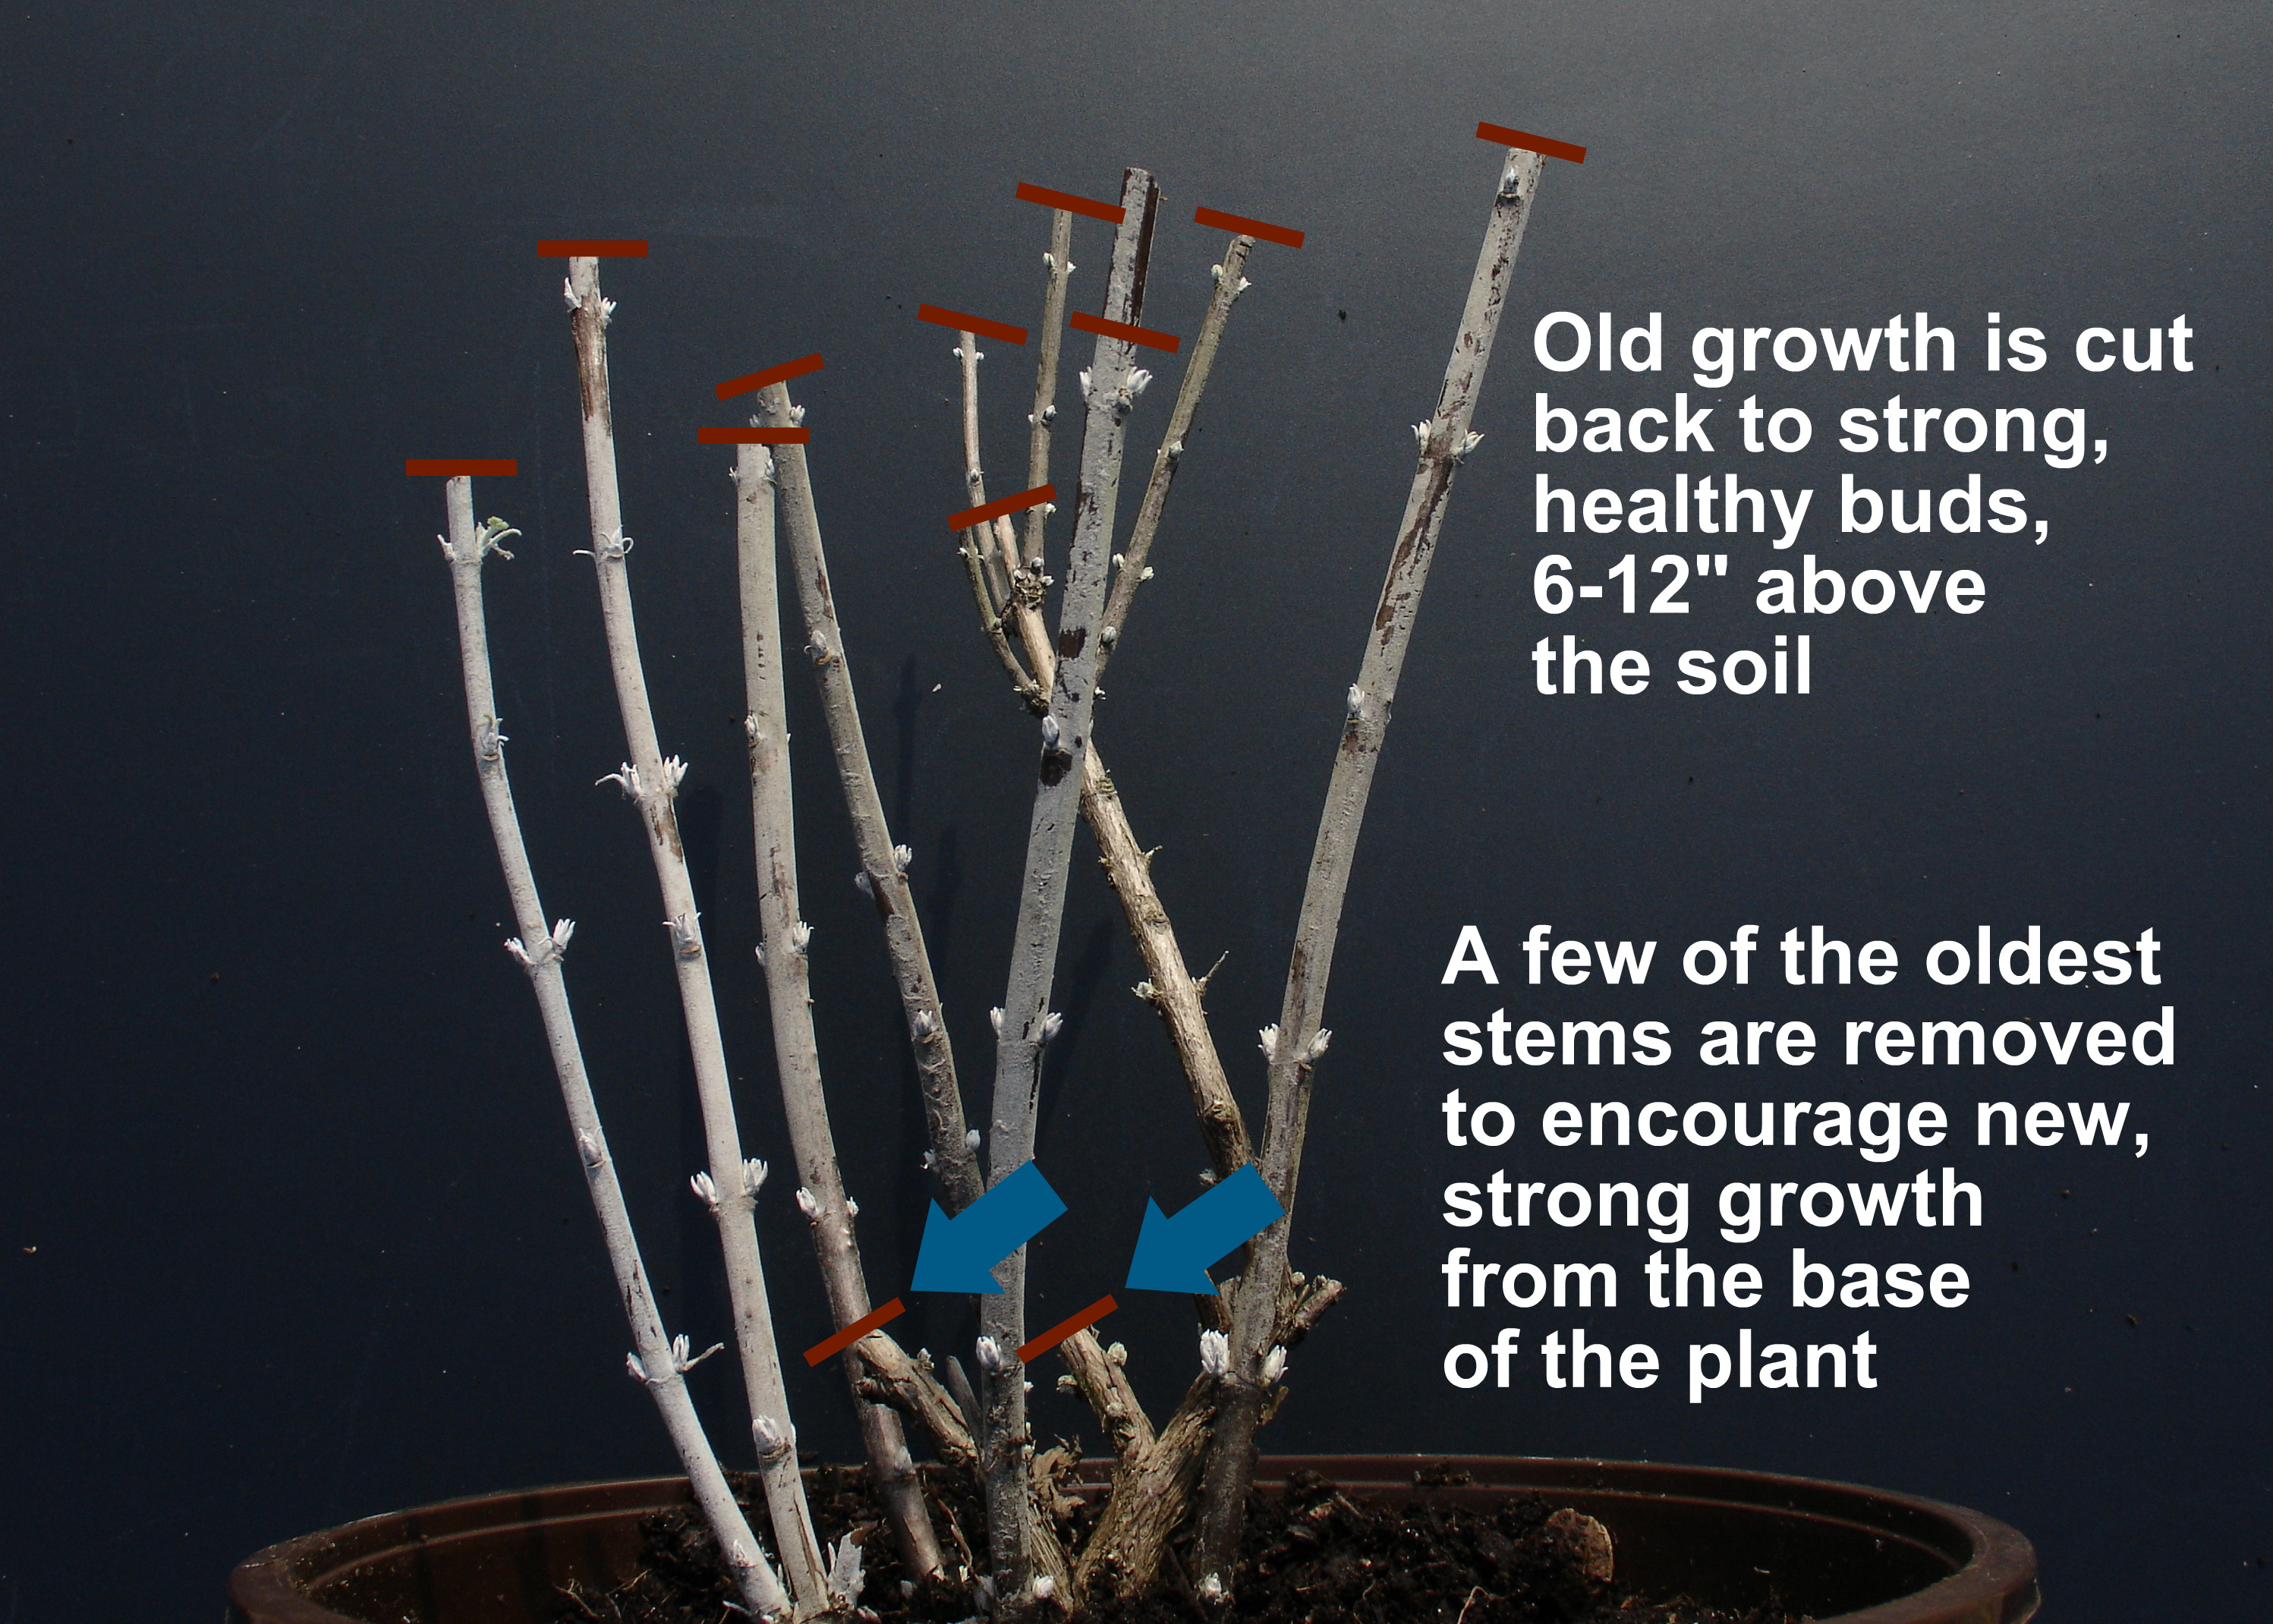
Objectives for pruning Russian Sage are: Removing dead twigs, removing broken or damaged branches, stimulating strong growth from a balanced framework of stems that will flower the following summer.
Follow these steps to prune Russian Sage while dormant:
Cut back all growth from the past season to healthy buds, within 6-8 inches from the soil.
Remove any dead branches as well as broken or damaged wood.
Remove any skinny twigs incapable of supporting strong new branches next season
If possible, cut back a few of the oldest stems close to the soil, to encourage strong young shoots to replace the older ones.
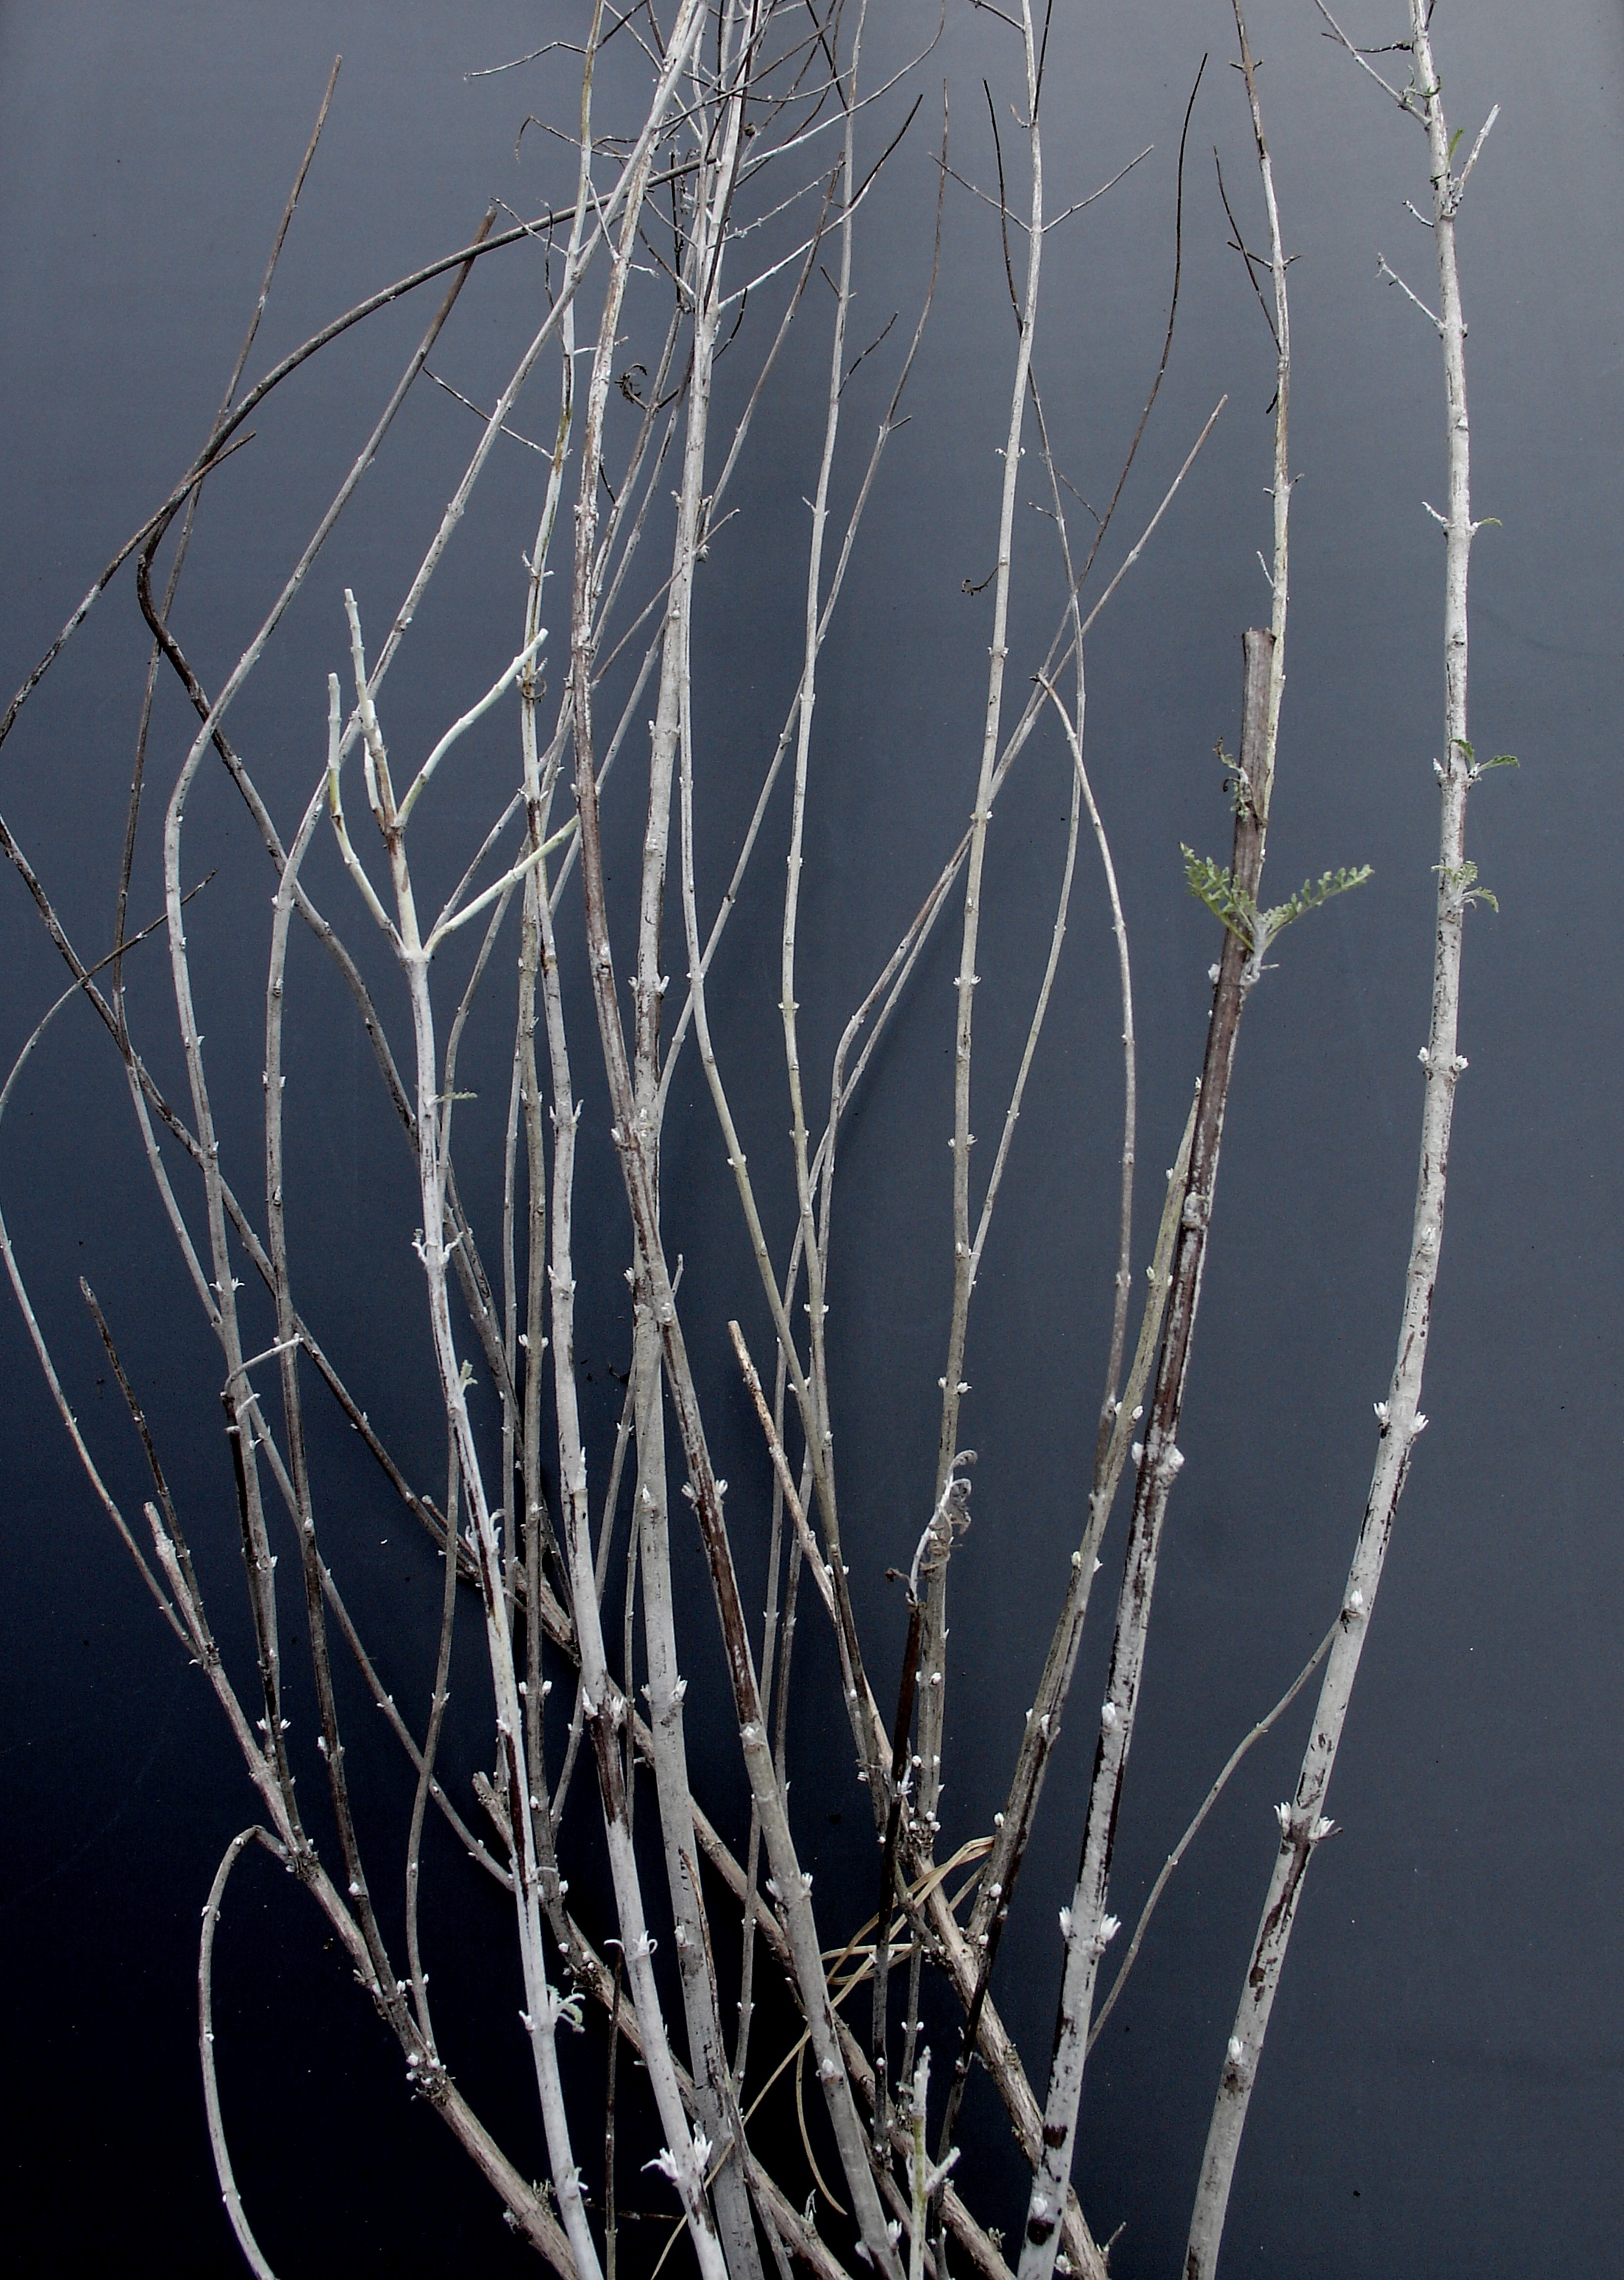
Russian Sage before pruning
Now that we know the right way to prune Russian Sage, I’ll let you in on a little secret. This plant is extremely forgiving; most landscapers on the island use the “Hair Cut” method of pruning. Just gather up the twigs in one hand and prune them all off evenly with the other. Or, if you prefer, take to them with your hedge trimmers! New growth next summer will quickly cover any dead twigs remaining.
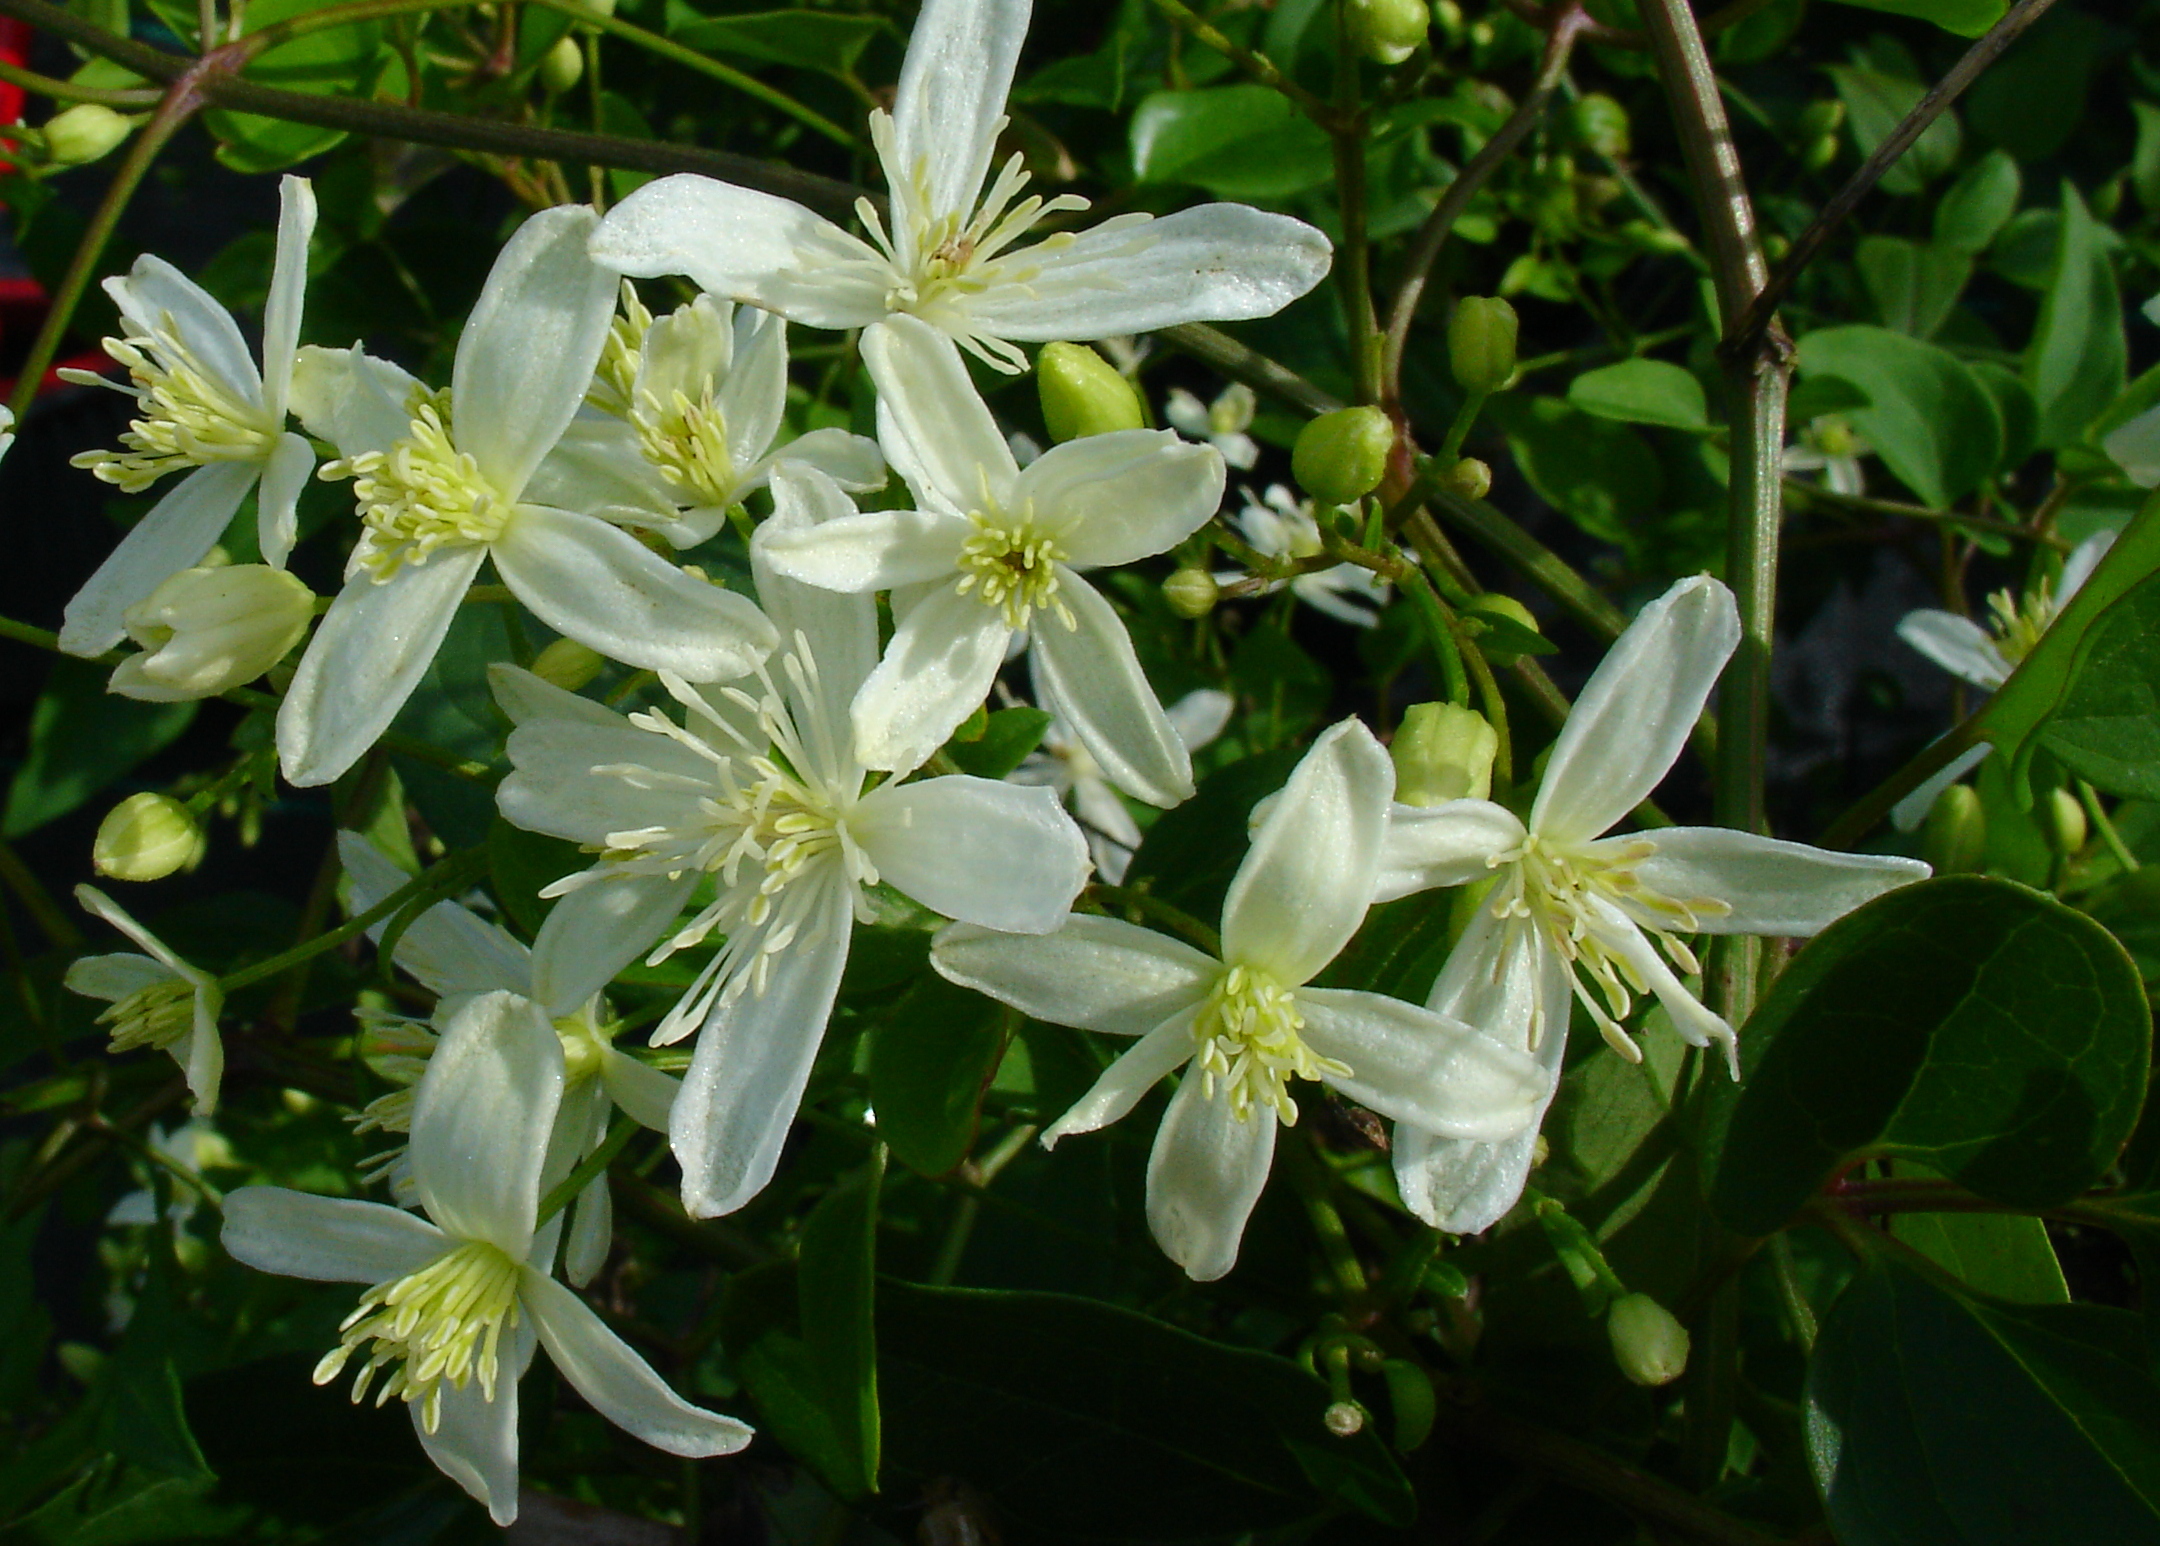
September on Nantucket is punctuated by a few really special plants. One of these is Clematis paniculata. Although this species of clematis does have a reputation for being somewhat aggressive, many gardeners consider it well worth the time spent pruning and tying.
Sweet Autumn Clematis bursts into growth in spring and will easily grow to cover a story-tall trellis in a season. It is beautiful trained along a fence, or up a pergola or down spout. Or let it sprawl along the ground in open areas as a ground cover. Plant it in full sun to part sun in average soil and this clematis will reward you with dark green growth all season and thousands of delicate white flowers in September. Even the soft, silvery seed heads are attractive, after the flowers fade.
Here are a few pointers to get the most out of Sweet Autumn Clematis in the Garden:
Cut back Sweet Autumn Clematis to within a foot of the ground each year while the plant is dormant. Unpruned stems left to mature for years will become woody and leafless. As well as being unattractive to look at, these stems will not produce new growth or flowers. Unpruned vines will only flush out at the top, producing a weird top-heavy appearance.
Take the time to train the clematis as it grows. Clematis do not cling with tendrils like other vines, their leaves actually twist around supports to climb. This habit requires a little tying now and then to help it cover the support neatly. If kept tight to the support, the rangy look that these plants can develop is obviated, and they take on a more stately appearance.
If used as a ground cover,be sure to pin or trim it around other ornamentals. These vines can quickly cover and smother adjacent plants.
If any seedlings appear in the garden, pull them up when they are young. The longer volunteers are left to establish the more difficult they are to remove.
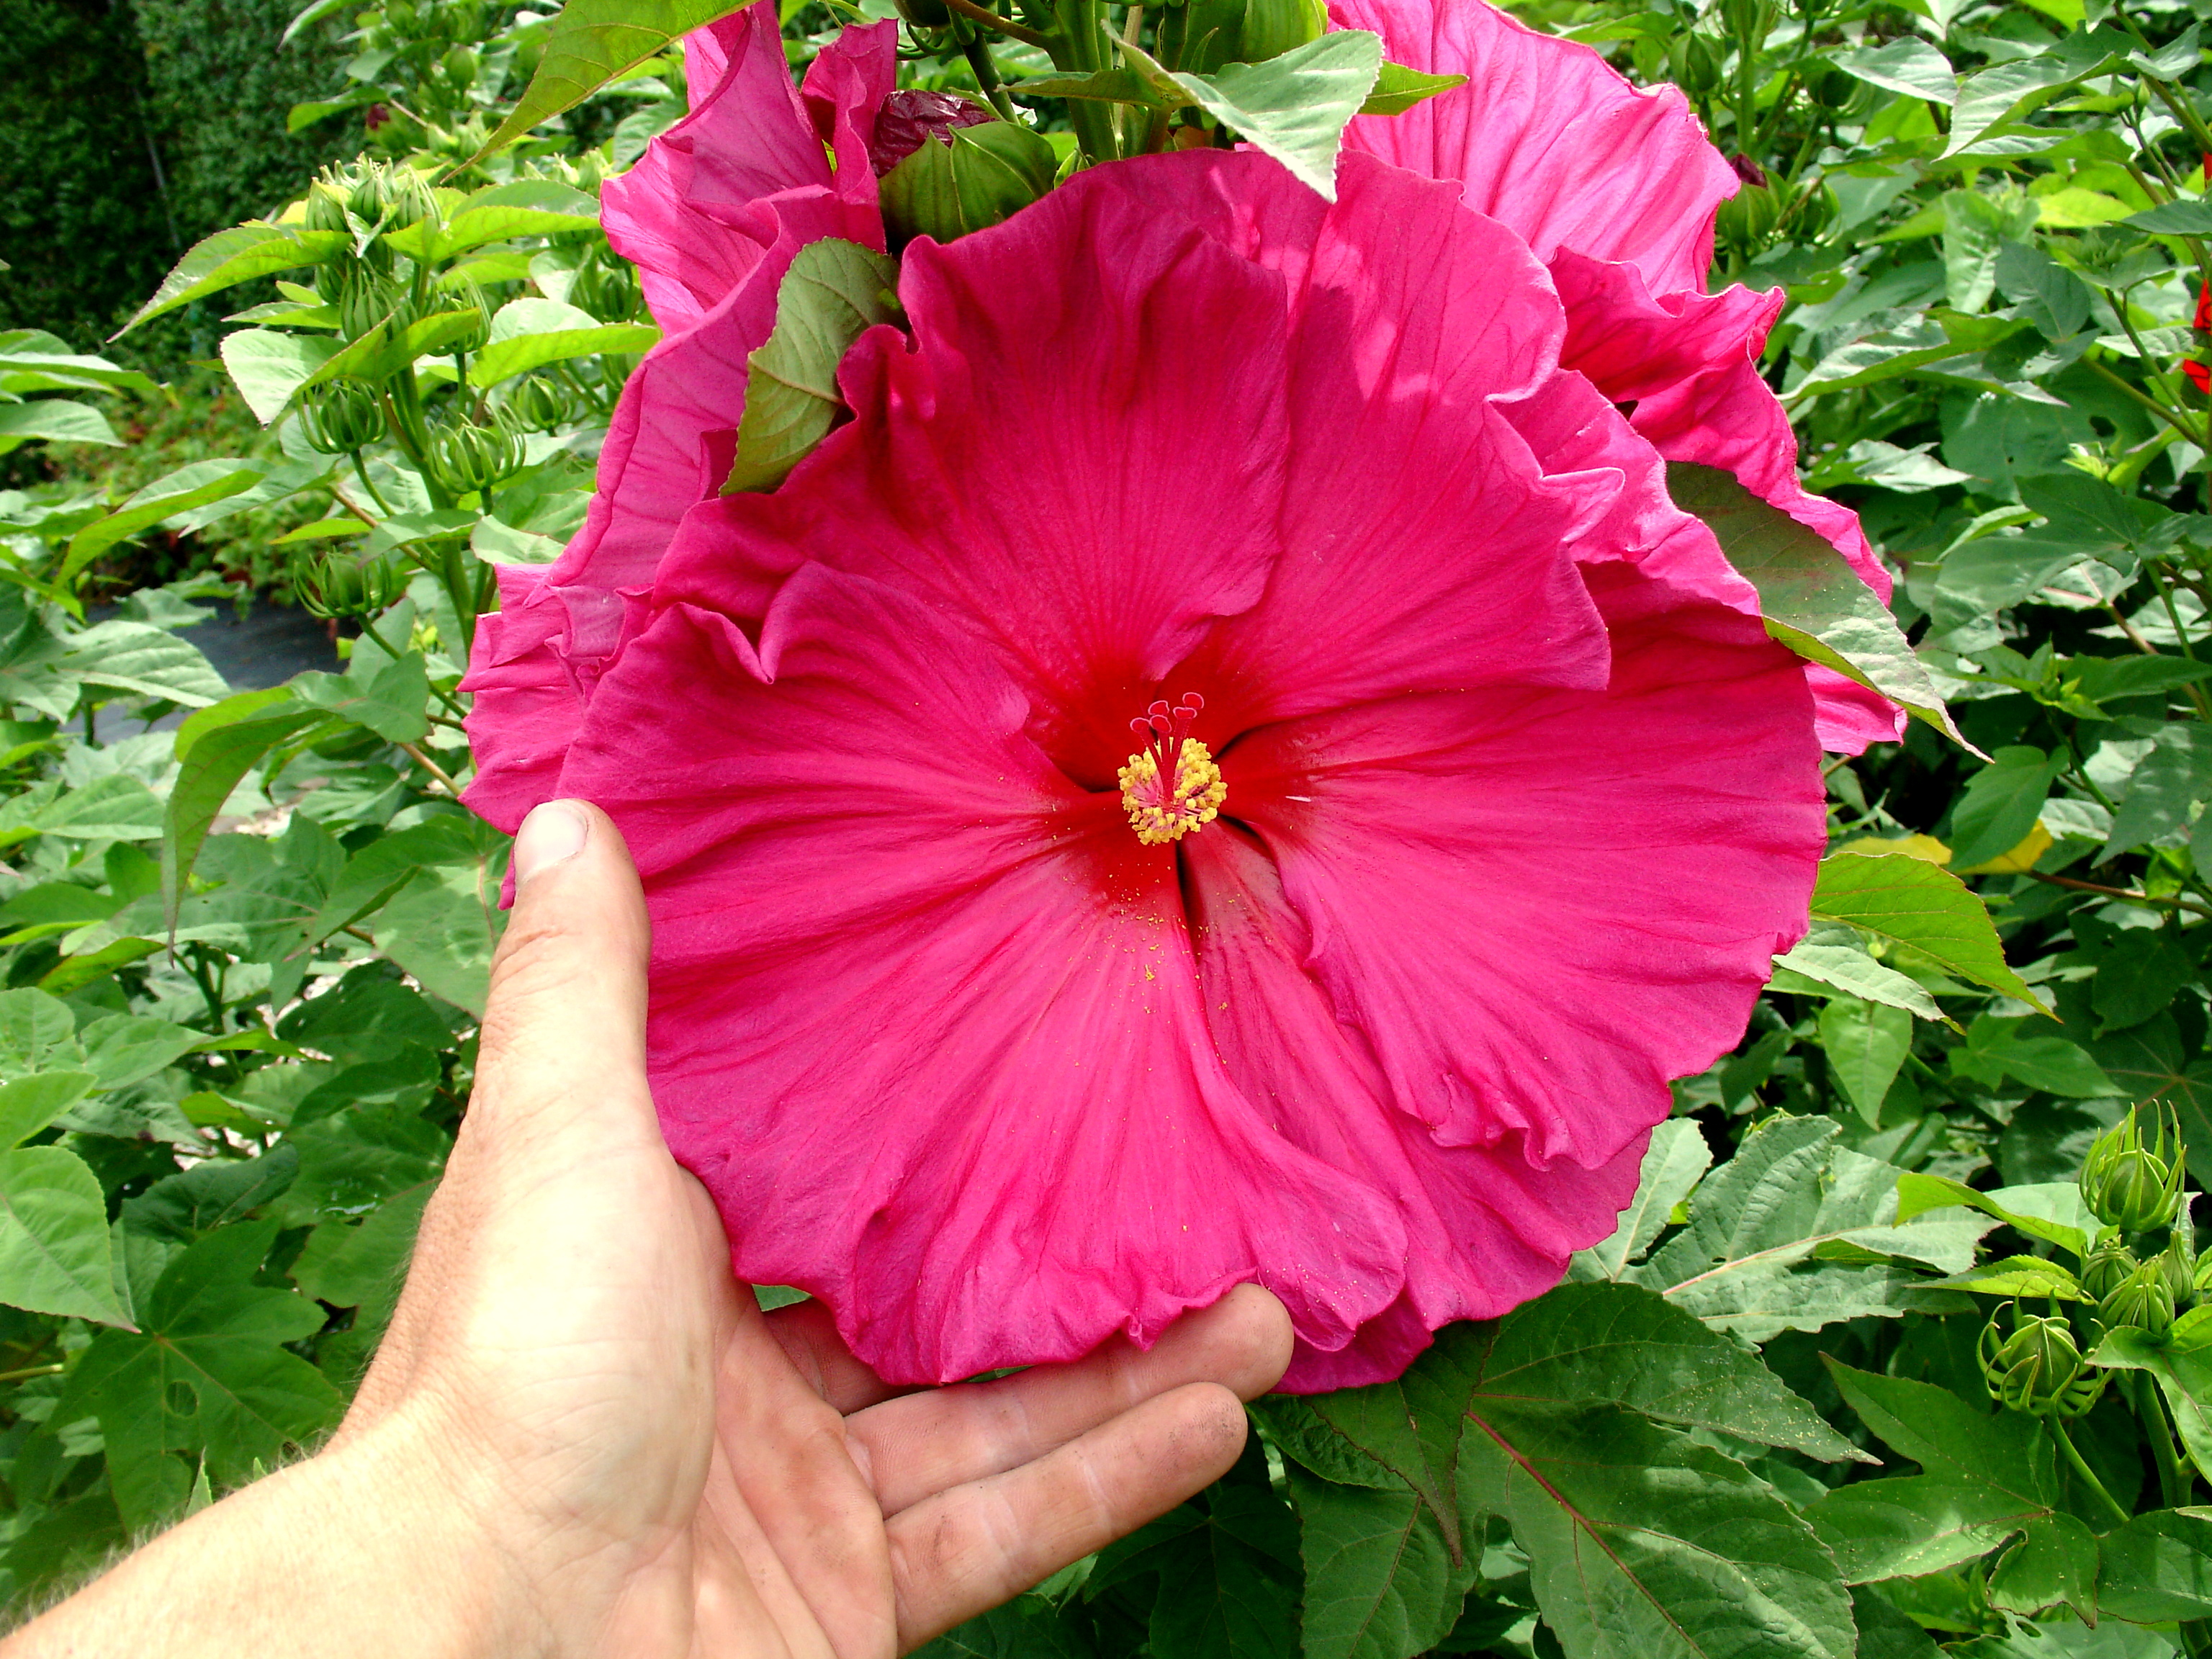
Hibiscus ‘Jazzberry Jam’ – Jazzberry Jam Rose Mallow
August is often a tough time in the garden, here on Nantucket. Weeks of hot, humid and windy weather can really take a toll on the flowers we work so hard to grow. Who wants to be out deadheading and staking Cosmos, when you could be at the beach, anyway? Get your flower fix from Nantucket’s Native Garden! The magnificent show of Rose Mallow’s tropical-looking flowers along the islands wetland areas is more than enough for me! If you haven’t seen the mass of pink flowers next to the Bamboo Forest on Madaket road, slow down on the way to the Landfill this Sunday, you won’t be disappointed!
We sell a wide range of Hardy Hibiscus here at the Nursery. The enormous dinner plate-sized flowers are a customer favorite. There are white, red, pink, and even bicolor selections! New gardeners are surprised that such a show-stopping flower is incredibly easy to grow. Plant it in full sun in evenly moist, somewhat fertile soil, you won’t be disappointed each August.
A few points to remember when growing Hardy Hibiscus:
•New shoots from Rose Mallow are very late to show in the garden. When you cut them back in the winter, leave the spent stalks a foot tall, so that you know where they are, and don’t trample them as you work in the garden early in the season.
•These are plants that naturally grow next to wet areas. If they dry out, they will lose leaves in a hurry. Keep them evenly moist!
•If you find your plants tend to get leggy or only produce a few shoots each year, give them a light pinch early in the season and they will branch out and have even more flowers for you.
MYTH: Drought tolerant plants don’t need supplemental water
TRUTH: All plants need water!
Buddleia davidii ‘White Profusion’ – White Profusion Butterfly Bush
Drought tolerant plants are those that, once established, will survive receiving the typical (or slightly less than typical) amount of rainfall in our area without the need for supplemental irrigation.
But to be clear, surviving isn’t necessarily garden tour ready! Prolonged periods without rain force the plant to conserve water in its most important tissues. With herbaceous plants, that’s the roots. For woody plants, this also includes the framework above the ground. Plants need a lot of water to produce new growth and keep their leaves hydrated. So, during times of drought many plants will stop growing all together and begin to shed leaves. Some plants will go completely dormant, and appear like they normally do in winter, with no sign of life at all above the ground.
In order to keep your plants looking their best, it’s a good idea to give them a deep soaking if it seems dryer than normal.
Keep in mind, plants that are considered drought tolerant generally have very extensive root systems, or a long taproot. When plants fresh from the nursery are put into the ground, they don’t have those roots yet to help them pull in moisture. We recommend keeping the area around new plants consistently moist (not soaking) for at least the first two weeks after planting. This give the plant time to send out new roots into the surrounding soil. After the first two weeks, monitor the soil in the bed. If there isn’t enough rain to keep the soil damp down a few inches, water weekly.