Digiplexis

We love foxgloves.  These stately, nostalgic biennials have been a stalwart of the early summer cottage garden for ages. Their spires of unique, bell-shaped flowers bring a magical quality to any mixed planting.  On the island, they are equally happy in sun or shade.  The tall varieties tower over the back of the border, while the more compact selections are suitable to mingle with lady ferns and hostas at the edge of shady paths.

In recent years, there has been a break-through in hybrid foxglove.  DIGIPLEXIS is the result of an inter-generic cross between Digitalis and Isoplexis, a shrub indigenous to the Canary Islands.  The resulting hybrid retains positive attributes from both plants.  They bloom in their first year on well-branched plants, with a stunning depth of color for the entire summer!

Illumination Flame
‘Illumination Flame’

Digiplexis ‘Illumination Flame’ was the first on the scene.  Bred by Charles Valin at Thompson & Morgan in the United Kingdom, this plant bears many spikes of flame-colored flowers from late spring to fall.  The hybrid nature of this plant makes the plant sterile, so there is no fear of volunteers.  Although Digiplexis is technically a perennial, gardeners on Nantucket haven’t had much luck wintering them over in the ground.  The best bet is to plant them as annuals and enjoy their stunning flower display for a summer, replanting them the following year.  They make a fantastic statement in pots, or in mixed perennial beds, where no other plant can perform quite as they do.


Berry Canary
‘Berry Canary’

We’ve gotten more and more into growing at Surfing Hydrangea over the last few years, so I thought I would give Digiplexis a try.  We’ve grown a great crop of ‘Berry Canary’.  This plant was introduced by Walters Gardens in the United States in 2014, and promises to be just as floriferous as the original.  The hot pink flowers on ‘Berry Canary’ have a creamy, speckled throat.  This selection is somewhat more compact than ‘Illumination Flame’, touted to grow only a few feet tall.  This more proportional habit may make it suit containers even better than ‘Illumination Flame’.  We still have a few left, why not give them a try?!


Ruby Glow
‘Foxlight Ruby Glow’

The popularity of this new plant has begun a breeding frenzy.  We expect to see more and more new varieties coming to market each year.  Check out the Foxlight series introduced last year.  We’ve got Foxlight Ruby Glow in stock as well.


Wonderful Weeds

Have you ever been weeding an endless, blinding, white shell driveway to find yourself carelessly throwing weeds into your bucket as if they have no value? Frequently, we find ourselves valuing some plants over others because of what we’ve learned as landscapers. Our view of plant life is formed by some old rule where one plant belongs and another doesn’t.  As it turns out, nearly every plant has a value beyond its ornamental purpose. You just have to think outside of the landscaper’s mindset. How exciting!

To a landscaper, weeds pulled during summer maintenance are little more than busy work. However, in the eyes of an herbalist, these same plants are highly valued for their essential vitamins, nutrients, and exponential healing qualities! Humans have been using plants as medicine for thousands of years; though recently, we have lost touch with our intimate knowledge of, and connection to the plant world. While much knowledge has been lost over time, modern people are rediscovering the many medicinal properties and uses of plants, re-establishing our necessary relationship with the natural world.

Here are few medicinal gems you are likely to come across while weeding the gardens, driveways, lawns, and patios of our beloved island:

Dandilion
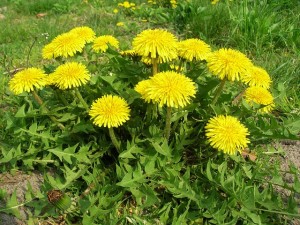
Dandelion, Taraxacum officinalis, is probably one of the most recognizable weeds and can be identified by its bright yellow flower and hairless, dark green leaves. The plant’s tap root can be processed into a tincture, tea, or oil infusion. As a tea or tincture, dandelion root works to cleanse the liver, aid digestion, and ease pre-menstrual symptoms and menstrual bloating. The flowers, when drank as a tea, help to hydrate skin. When applied topically, an oil infusion of the flowers can soothe sore muscles and facilitate stress release from the body. Dandelion leaves are edible and high in vitamins and minerals.

plaintain
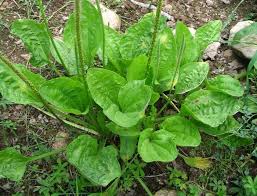
Plantain, Plantago major, goes hand in hand, or tap root in tap root, with our friend the dandelion. It can be identified by its broad, rounded, glossy leaves, with small, greenish flowers. Plantain is most effective when its leaves are administered as a poultice. A plantain poultice works to stop the bleeding of minor cuts, ease pain from bee stings, and prevent swelling. Topically applied, oil infusions of plantain work to quickly heal cuts, bruises, scratches, stings, and rashes.


BurdockAnother delightful, medicinal tap root is burdock, Articum lappa. It can be identified by its large leaves with red stalks, and wooly undersides. When processed into a tincture, burdock root is a supreme liver, kidney, and blood purifier. As a tonic, burdock cleanses the lymph, sweat, and oil glands. When applied topically as a poultice or oil infusion, it can heal heated skin conditions such as acne, rashes, eczema, and burns. Although not the tastiest of root vegetables, when eaten, burdock improves intestinal flora.

Chickweed
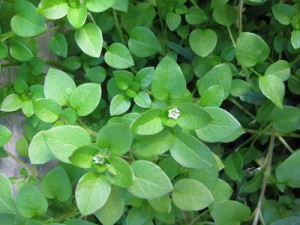
Chickweed, Stellaria media, can be identified by its small, white flowers and low, dense, creeping green foliage with a single line of hairs on its smooth stalks. Chickweed is most commonly eaten as medicine, packed with essential nutrients, such as calcium, potassium, protein, and vitamin C, to name a few. When taken as a tea or tincture, chickweed cools heated chest congestions and eases bladder and kidney discomfort. Applied topically as a poultice or oil infusion, chickweed draws out infection, decreases swelling, and heals minor injuries, itches, bites, sores, bruises, and blisters.

Yarrow
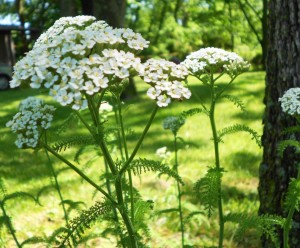
And last but not least, yarrow! Yarrow, Achillea millefolium, can be identified by its feathery, sprawling leaves and flat, composite, white flowers. While there are many beautiful, brightly colored hybrids of yarrow in our gardens, only the wild, native variety found in meadows is medicinal. Yarrow is traditionally used as an antiseptic poultice for wounds, drawing out infection and stopping bleeding internally and externally. Yarrow’s flowers can be taken as a tea to stimulate the immune system at the onset of a cold or flu, control fevers, and promote sweating from colds and flues. In tincture form, yarrow flowers work to boost the immune system and serve as a digestive aid and liver cleanser.

This is just a glimpse at a few of the medicinal qualities of the common weeds found on Nantucket. We have found that these are not weeds at all, but nature’s medicine waiting to be eaten, drunk, or slathered all over our aching, over-worked bodies.  So next time you’re hustling through a garden bed, thoughtlessly adding weeds to your compost pile, think again! That dandelion could help your hangover, that burdock could erase your acne, that yarrow could cure your cold.

Herbal product terms:
Oil infusion: The product of infusing oil with plant material to withdraw the medicinal qualities of the plant into the oil, often used with beeswax to make salves, applied topically
Poultice: Crushed up, fresh plant material that is applied to infected area on skin
Tea: The product of dried, crushed plant material infused in hot water for drinking
Tincture: The product of infusing alcohol with plant material to withdraw the medicinal qualities of the plant into the alcohol, commonly taken orally for internal purposes.

– Sally Obremski


What’s Eating you?

Spittle bug emerging

Scientists estimate that there are 10 quintillion insects on the planet.  That’s 10,000,000,000,000,000,000 individual creepy crawlies!  And, boy, do they like to eat!  From early spring to late winter, it is extremely likely that someone is dining your prized plant’s leaves, stems, or roots.

Control of insects in the garden is a hot button issue.  Often times gardeners are tempted to use strong insecticides as soon as they see a single bug.  Hell, I’ve been known to grab a spray bottle of Sevin myself from time to time.  Luckily, we’ve all gotten much more sensitive to the fact that beneficial insects are also living in and working for us in our gardens.  In order to minimize the use of poisonous chemicals and the destruction of beneficial insect populations, it’s extremely helpful to know what kind of insect is causing the damage you see.

When it comes to identifying which insect is causing the problem, there are a few ways to go about it.  The first is to research the plant where most of the damage is occurring.  Many plants are susceptible to particular buggies.  Those plants can become infested with hundreds of insects of a single type.  For example, roses are well-know to harbor aphids.  Every year at the nursery, I fully expect to see them by June, and begin to check all the roses for this pest.  I’ve researched many different ways of killing them, but I most often use an organic method that I was taught years ago.  I just put on a gardening glove and squish them!  Since most of the aphids cluster on the tips of the new growth, I can easily murder 90% of the population in one go. A second squish-a-thon a week later, and the population is at such a low level that’s it hard to notice any further damage.

The second way to determine what is eating your plant is by studying the damage itself.  My favorite “Bug Book” is  Garden Insects of North America, by Whitney Cranshaw.  This book breaks down the feeding patterns of insects into 9 categories, and gives a very extensive list with great pictures.

Keeping roses as the example, I noticed a number of holes in the leaves of some ‘New Dawn’ roses recently.  I open up my trusty Garden Insects of North America and turn to Chapter Three, “Leaf Chewers”.  Unfortunately, I have not seen the actual insect feeding on the leaves, so I can’t really settle on a specific pest yet.  I flip to another great book in my library, The Organic Gardener’s Handbook of Natural Insect and Disease Control by Barbara Ellis and Fern Marshall Bradley, to see what insects commonly cause this kind of damage on roses.  Now it becomes process of illumination.  I know it’s not Japanese Beetles, because they are large, and feed during the day – I would have seen them, and the damage would have been more serious.  I also rule out large caterpillars, because they also feed during the day, and leave behind noticeable droppings, which I should have seen clearly.

It’s likely that the damage on these leaves is some sort of sawfly larvae or rose chafer.  Most of these leaf-eaters are already done feeding for the season, and should not cause further damage.  So, in this case, I will wait until next June, and begin to pay very close attention to the leaves.  At the first sign of the pest, I will apply an appropriate insecticide.

For photos of some common insects and the damage they cause on plants, check out our pinterest page:

Find us on Pinterest

-Brad MacDonald


Spider Plants

During the winter when we have to spend more time indoors than out, the avid gardener can start to get lonely for plants. This winter, I’ve found the cure: houseplants! I have to admit, I’ve never been the kindest to houseplants. I’m great with shrubs, annuals and perennials outdoors. But for some reason, I’ve never been able to commit to the proper care of live plants indoors. I’ll pick up a Boston fern at Bartlett’s in the fall and watch it slowly languish over the winter from neglect. Generally, it will be pretty much dead by spring and I can toss it into the compost heap about the time I plant my carrots in the vegetable garden.

This fall, I decided to try something a little different. I’d been living in a basement apartment, and I knew I couldn’t bare to be down there all winter without some kind of greenery. So I committed to keeping my Chlorophytum comosum (Spider Plant) alive. My partner even bought several other plants to keep it company. Of the whole foliage contingent at my place, the spider plant has been the most successful.

I’ve moved it all over the house; from the bright, humid bathroom, to the dim, dry living room. It doesn’t seem to care in the least. I’ve let it completely dry out several times during trips off island, and it keeps going strong. In fact, it seems to love it! No matter how much I neglect it, the thing just keeps on pushing out babies left and right. When I can be bothered, I snip off the little plantlets that pop up and dangle over the side of the pot. I stick them in glass of water, and watch them root over the course of a few weeks. I’ve had so much fun that I’ve even potted a few up and given them away to my friends!

So after turning my nose up at houseplants for years, the spider plant has converted me! I am now a happy indoor gardener. If you’ve killed hundreds of dollars worth of lucky bamboo, diefenbachia and ficus trees like me, fear not! A $12.99 trip to Stop and Shop might make all the difference in your indoor gardening success. Give the Spider Plant a try! Soon enough you too, could have a whole house filled with calming plants to keep you company during the cold days of winter!


The Truth about Hollyhocks

Hollyhocks (Alcea rosea) are an old-fashioned staple flower of the cottage garden and a favorite of island gardeners. Stately plants with spires of flowers up to six feet tall grace the back of the border or adorn white picket fences.

Flowers may be single, double, pastel, or saturated, sometimes even bicolor. In perfect growing conditions, they grace the garden for six weeks or more, as flowers open continually up the stalk while the mature ones fade toward the bottom. Because they are biennial plants, during their first growing season they do not flower, rather they form a basal rosette and store energy for the upcoming summer. During the second year, they flower, set seed and die.

Self-seeding is generally sufficient to keep a garden filled with flowers year after year. To be absolutely certain, the nervous gardener will collect seed in September that has ripened on the plant and grow out seedlings right away. Allowing the seedlings to overwinter in a protected area forces the plant into a bloom cycle when growth resumes. Ta Da! Flowers from year to year.

All that said, experienced gardeners already know the DIRTY TRUTH about hollyhocks. Hollyhocks are riddled with disease and insect pests! Rust is Real! Snails are horrible hollyhock eating monsters! If your plants make it to flowering with any leaves at all, INCOMING!!!!! Japanese Beetles cover the plants quickly devouring all that remain! Ok Ok, so you can definitely Sluggo for the slimies, and you can spray insecticide for the avian invaders, but what can you do about rust?


Hollyhock RustHollyhock Rust (Puccinia malvacaerum) is a fungal disease effecting leaves and stems of many plants in the Malva family. Rust is NOT avoidable. Fungal spores are present in the soil, on non-host plants and leaf litter. They are tiny and light enough to be blown hundreds of miles from their point of origin. Once the spore lands on a damp hollyhock leaf, it germinates almost immediately, and infiltrates the leaf’s tissue. As the fungus grows inside the leaf it damages the healthy plant cells, weakening the leaf and disrupting photosynthesis. The rust completes its life cycle quickly and causes orange pustules to erupt on the surface of the leaves. Spores are released from these pustules and infect more plants.


Control measures may be helpful, but will not stop the infection from occurring. Be sure to clean up the garden very well in the fall. Making sure there is no residual hollyhock leaf litter that may harbor spores is a good start. Try applying wetable sulfur early in the season, to create an inhospitable environment for the spores to grow in. Continue to spray the plants as new growth emerges. Allow good spacing between plants to speed drying of the leaves after morning dew. When leaves do become infected, remove them. Most importantly, plant tall, late season perennials in front of your hollyhocks to mask their foliage. Phlox works well, as do Montauk daisies.


Myth: Drought Tolerant Plants don’t need water

MYTH: Drought tolerant plants don’t need supplemental water

TRUTH: All plants need water!

Buddleia davidii 'White Profusion'  - White Profusion Butterfly  Bush
Buddleia davidii ‘White Profusion’ – White Profusion Butterfly Bush

Drought tolerant plants are those that, once established, will survive receiving the typical (or slightly less than typical) amount of rainfall in our area without the need for supplemental irrigation.

But to be clear, surviving isn’t necessarily garden tour ready! Prolonged periods without rain force the plant to conserve water in its most important tissues. With herbaceous plants, that’s the roots. For woody plants, this also includes the framework above the ground. Plants need a lot of water to produce new growth and keep their leaves hydrated. So, during times of drought many plants will stop growing all together and begin to shed leaves. Some plants will go completely dormant, and appear like they normally do in winter, with no sign of life at all above the ground.

In order to keep your plants looking their best, it’s a good idea to give them a deep soaking if it seems dryer than normal.

Keep in mind, plants that are considered drought tolerant generally have very extensive root systems, or a long taproot. When plants fresh from the nursery are put into the ground, they don’t have those roots yet to help them pull in moisture. We recommend keeping the area around new plants consistently moist (not soaking) for at least the first two weeks after planting. This give the plant time to send out new roots into the surrounding soil. After the first two weeks, monitor the soil in the bed. If there isn’t enough rain to keep the soil damp down a few inches, water weekly.


Over-Wintering Dahlias

Butterfly on DahliaOnly a short few days ago, dahlias were still blooming in Nantucket gardens. But our mild Autumn was brought to a halt last week with a sudden hard frost. Dahlias, being tropical flowers have since withered. But they’re not dead, only done for the season.

With a little work, you can save your Dahlias for next year! Dahlia tubers must be protected from freezing in order to survive the winter. Some gardeners have had success ‘leaving them where they lie’ and just covering them with an overturned nursery pot. I might not even attempt this approach in an area outside of a protected garden in town, but if you’re up for it, why not give it a try? Cut back most of the top growth and turn a nursery pot over above the plant. Keep it in place by pushing bamboo poles into the soil through the holes in the pot. If you like, add some additional insulation with straw or mulch inside the pot. The pot also keeps the newly emerging growth safe from deer and rabbits, just be sure it is in good contact with the soil.

If you are not a gambler, there is a safer way to overwinter Dahlias. Cut the  top growth back to a few inches. Gently lift the whole tuberous mass from the soil with a garden fork. You don’t want to damage the tubers in any way, so be sure to dig at least a foot from the stalk on all sides. Once its out of the ground, gently remove most of the soil with your fingers. A quick rinse with the hose will get those nooks and crannies nice and clean. Take a good look at what you have. If there are any areas of insect damage, remove them entirely with a sharp knife. Any tubers that are at all soft, can also be removed, as they are likely to rot in storage. Allow the tubers to dry out for a few days in the shade.

Label each Dahlia with its variety and the date you stored it away. Pack them in a cardboard box wrapped in newspaper or peat moss. Whatever medium you store them in, try to keep it on the dry side of damp for the duration of the winter. Put the box in a place that is cool and dry, but where the temperature will not fall below freezing. Once a month or so, open the box and check them for any sign of mold, or excessive shriveling (a little is normal). If they seem to be too dry, give them a light misting. If they are too moist, leave the box open for a day or two before storing them again.

If all goes well, you can plant them in the ground again in late May and they will give you another year of amazing flowers!