Hardy Kiwi

A great many years ago, I was visiting a friend’s farm back home in Nova Scotia and noticed a wild-looking plant covering a shed at the edge of the property. It was a huge tangle of broad leaves and tendrils from the soil up past the roof line. I had never seen anything like it, so I asked her what it was. She told me that it was a kiwifruit.  The only kiwi I was aware of were brown, fuzzy, tropical fruit that you could buy at the grocery store, so I just assumed she was off her gourd and moved on.  Since then, I have learned a lot more about plants and have grown to really appreciate the hardy kiwi species that are available for gardeners in the northern hemisphere. We have offered both Actinidia kolomikta (Arctic Kiwi) and Actinidia arguta cultivars in the past.

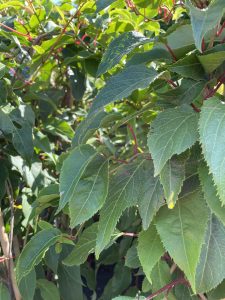
Hardy Kiwi are native to Eastern Russia, Korea, Japan and parts of China. These plants are extremely vigorous vines with twining tendrils that require strong support.  Their leaves are generally glossy-green and oval shaped, but there is variation among the cultivars and species.  Some are more serrated, or with red leaf-stocks and vines, others are even variegated with pink and white splotches.  Hardy kiwi have no particular pests to speak of (which is a marvel for a fruiting plant).  These kiwis are smaller than the typical grocery store kiwi, but the skin isn’t fuzzy, so they can be eaten right off the vine.

Like hollies, bayberry and many other plants, hardy kiwi is dioecious.  So, just like people, they have separate male and female plants.  In order to get fruit, it is important to plant either a self-fertile variety like ‘Issai’ or both a male and female of the same species. ‘Kens Red'(female), for example, should be planted along with another male Actinidia arguta in order to fruit.  They do require specialized care to produce fruit dependably, so it’s a good idea to do some in-depth research if fruit is the major goal.  Proper pruning and trellising can really help with getting a consistent crop.  That being said, I’d highly recommend growing them just for their ornamental value.

If fruit-set is just a bonus, why not give one or two a try and just see how they do?  Any garden situation where a Wisteria would be the traditional choice could absolutely handle a hardy kiwi vine.  They are equally, if not more, vigorous but with more handsome leaves.  They would look stunning covering a pergola or trained up along the side of a building. If allowed to grow across the slats of a pergola, this vine would provide quite a lot of shade below.  They could also do a great job of beautifying the fencing around a tennis court or pool, while providing good screening.

Including edible plants in primarily ornamental landscapes has been gaining in popularity over the last number of years.  As hardy kiwis are both attractive and productive, I think they are a perfect addition to the wisterias, roses and clematis that most gardeners are used to planting.  So, if you are up for a little challenge, and have some room – hardy kiwi is a great new(old) plant to try!


Tomato Training 101

Chocolate Sprinkles tomatoI hate growing tomatoes.  They seem to get every problem that plants can get:  early blight, late light, anthracnose, grey mold, damping off, powdery mildew, nutrient deficiencies, tomato horn worms, aphids, nematodes, spider mites … the list seems endless.  That being said, every year we have a few tomatoes left over at the nursery that find their way into large pots for staff enjoyment.  They are most often neglected and the harvest is minimal if any.  But once again, I’ve gone for it.  We have some ‘Green Zebra’, ‘Sungold’, ‘Cherokee Purple’, ‘Chocolate Sprinkles’ and ‘Lemon Boy’.  I’m determined to have a bumper crop this year!


twineI am by no means an expert on tomato culture, but I have done a lot of reading over the years.  I’m still a little stymied when it comes to the perfect nutrition for these plants, but when it comes to training, I think I have it down.  We’re lucky to have a greenhouse at the nursery.  Growing these veggies under a roof seems to be making a big difference already.  Here is my set up:  I tied a thick length of twine to one of the purlins (supporting pipes) that runs down the length of the greenhouse and allowed it to dangle down to the plants in each pot.  Next I tied each plant to the twine, with a loose figure eight knot using some flexible tape.  I planted two tomatoes in each plastic nursery pot, super deep.  Then I filled them up with nursery growing mix and some slow release fertilizer to get them going.


trainingIf left to their own devices, these plants would sprawl on the ground, forming a tangled heap with smaller, lesser-quality fruit.  Judicious training and pruning should encourage fewer, but higher-quality, tomatoes that are held close to the support and easy to pick.  Proper pruning also maximizes air flow and sun exposure as well, hopefully reducing fungal infections.


Leaf axilAs the plants grow, I select two leaders and continue to tie them loosely to the twine support as they grow.  I prune away any other shoots.   I have continued to prune the vines every week.  Most of the growth is at the tip of each leader, but there are also many side shoots that emerge from the leaf axils along the vine.  I pay close attention to those shoots and pinch them off when they are a few inches long.  If I miss a few, and their diameter increases, I use my pruners so that I don’t damage the vine trying to tug them loose.


Fruiting Pears

Pyrus Bartlett-001
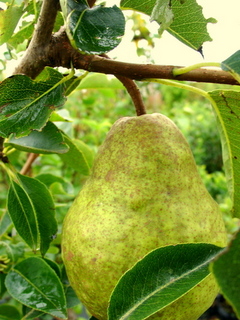
We sell hundreds of ornamental trees on Nantucket every year.  And as much as I love selling majestic Elms, elegant Styrax and the like, I have a special place in my heart for fruit bearing trees.  There is something really exciting about being able to grow fruit for yourself.  Pear trees, in particular, seem to be very rewarding.

Pears grow well when planted in full sun in average to fertile soil that is well drained.  Like other fruit trees, they require a little care and benefit from a spray program to control certain pests.  But if well cared for, a good crop is within the reach of any home gardener.

Similar to apples, European pears require more than one variety to ensure proper pollination.  If a pollinizer is not planted within 100 feet of the desired variety, the crop is likely to be very small or non-existent.  The standard pear for flavor and texture is ‘Bartlett’.  This variety is properly pollinated by ‘Bosc’.   ‘Sekel’ another common variety, will not pollinate ‘Bartlett’, so be sure to add a third variety to your yard if you want to try ‘Sekel’ as well.

All that being said, Asian pears are self-fruitful.  So if you only have room for one fruit tree, try an Asian pear.  These are the round, brown varieties that are found year-round in the store.  They tend to be very crisp, but have less flavor than European pears.  Although less hardy than their European cousins, they should do well on Nantucket due to our mild winters.

Standard pear trees can get quite large.  Luckily, the fruit trees we sell are generally semi-dwarf.  This means that one can expect our fruit trees to mature at about 20 feet.  The smaller size makes these trees easier to spray, prune and harvest.


-Brad MacDonald


What’s Eating you?

Spittle bug emerging

Scientists estimate that there are 10 quintillion insects on the planet.  That’s 10,000,000,000,000,000,000 individual creepy crawlies!  And, boy, do they like to eat!  From early spring to late winter, it is extremely likely that someone is dining your prized plant’s leaves, stems, or roots.

Control of insects in the garden is a hot button issue.  Often times gardeners are tempted to use strong insecticides as soon as they see a single bug.  Hell, I’ve been known to grab a spray bottle of Sevin myself from time to time.  Luckily, we’ve all gotten much more sensitive to the fact that beneficial insects are also living in and working for us in our gardens.  In order to minimize the use of poisonous chemicals and the destruction of beneficial insect populations, it’s extremely helpful to know what kind of insect is causing the damage you see.

When it comes to identifying which insect is causing the problem, there are a few ways to go about it.  The first is to research the plant where most of the damage is occurring.  Many plants are susceptible to particular buggies.  Those plants can become infested with hundreds of insects of a single type.  For example, roses are well-know to harbor aphids.  Every year at the nursery, I fully expect to see them by June, and begin to check all the roses for this pest.  I’ve researched many different ways of killing them, but I most often use an organic method that I was taught years ago.  I just put on a gardening glove and squish them!  Since most of the aphids cluster on the tips of the new growth, I can easily murder 90% of the population in one go. A second squish-a-thon a week later, and the population is at such a low level that’s it hard to notice any further damage.

The second way to determine what is eating your plant is by studying the damage itself.  My favorite “Bug Book” is  Garden Insects of North America, by Whitney Cranshaw.  This book breaks down the feeding patterns of insects into 9 categories, and gives a very extensive list with great pictures.

Keeping roses as the example, I noticed a number of holes in the leaves of some ‘New Dawn’ roses recently.  I open up my trusty Garden Insects of North America and turn to Chapter Three, “Leaf Chewers”.  Unfortunately, I have not seen the actual insect feeding on the leaves, so I can’t really settle on a specific pest yet.  I flip to another great book in my library, The Organic Gardener’s Handbook of Natural Insect and Disease Control by Barbara Ellis and Fern Marshall Bradley, to see what insects commonly cause this kind of damage on roses.  Now it becomes process of illumination.  I know it’s not Japanese Beetles, because they are large, and feed during the day – I would have seen them, and the damage would have been more serious.  I also rule out large caterpillars, because they also feed during the day, and leave behind noticeable droppings, which I should have seen clearly.

It’s likely that the damage on these leaves is some sort of sawfly larvae or rose chafer.  Most of these leaf-eaters are already done feeding for the season, and should not cause further damage.  So, in this case, I will wait until next June, and begin to pay very close attention to the leaves.  At the first sign of the pest, I will apply an appropriate insecticide.

For photos of some common insects and the damage they cause on plants, check out our pinterest page:

Find us on Pinterest

-Brad MacDonald


Blueberries

Vaccinium corymbosum flowers

Backyard fruit and veggie gardening is a big trend in gardening these days. It’s a real treat to pick your own blueberries instead of buying them from the Stop and Shop at $5.00 a quart! They are easy to grow and delicious eaten right off of the bush, or with cream and sugar after dinner on a warm July night.

There are two basic types of blueberries, high bush (Vaccinium corymbosum) and low bush (Vaccinium angustifolium) (there are also half-high varieties, but lets not get into that right now). Low bush blueberries are the kind that I grew up calling “Wild Blueberries” in Nova Scotia. They grow along the ground forming a dense groundcover less than a foot high.

The fruit is small and flavorful, but somewhat of a hassle to harvest.  I will never forget my first summer job hand-raking blueberries.  My brother and I were bussed out to the country where the fields were all marked off into rows for picking.  The blueberry rake looks much like an old fashioned cranberry rake.  It’s a metal box with lots of tines close together on the bottom and a handle on top.  The entire day is spent bent over scooping up berries and pouring them into buckets to be weighed.  We were paid by the pound, but at the rate we picked, I’m not sure if we averaged any more than thirty dollars a day.  I don’t quite remember how long it took for us to be fired, but I know it wasn’t longer than a week or two.  Lets just say, I wouldn’t make a good itinerant fruit harvester.

High bush blueberries are more shrubby, growing up to six feet tall.  They produce a crop of large berries held off the ground on the tips of the branches.  Blueberry bushes are not self-fruitful.  In order to get a good crop it is important to plant at least two different varieties close to each other.  It’s also important to pay attention to when the cultivars flower – early, mid or late.  In order to cross-pollinate, all the bushes must be in flower at the same time.  Try not to plant only one early and one late variety, as they might not overlap flowering period.

Blueberries prefer consistently moist, fertile soil that is slightly acidic.  In order to make them as happy as possible, amend the soil well at the time of planting, and consider using an acidifying fertilizer like Holly Tone if your soil is on the sweeter side.  Always plant blueberries in full sun to maximize the amount of flower buds set and the proper ripening of the fruit.  If your plants are happy they will fruit the first year, and bear a very good crop by the third year.  Consider pruning the plants after the third or fourth year to keep new, productive canes coming up from the base of the plant.  Check out YouTube for some great videos on Blueberry pruning http://youtu.be/fm6ZfpGy5oQ

I have compiled the following fact sheet with information on blueberries that are commonly available to us at Surfing Hydrangea to help our customers select the varieties that best suit their needs: Blueberry fact sheet

-Brad MacDonald


Fruiting Apples

Malus 'Scarlet Sentinel' - Scarlet Sentinel Pole Apple
Malus ‘Scarlet Sentinel’ – Scarlet Sentinel Pole Apple blossoms

Have you ever noticed the difference between an apple you buy at Stop and Shop in June and a fresh-picked Massachusetts-grown apple in September? It’s remarkable how much better the flavor and texture is this time of year!  If you are tempted to plant your own, why not take the opportunity to sample the range of fruit that might be available to plant.

When choosing apples to grow at home there are a number of important considerations:

  • Space: An un-grafted tree grown from seed can reach 20′ tall and wide! With modern grafting techniques, however, pomologists can control the size of the tree. Dwarf and semi-dwarf trees are generally preferred for growing apples at home. Or, consider an espalier (A tree trained flat into a formal shape) these can be planted on a wall, or a post and wire system.
  • Exposure: Fruit trees need lots of sun to produce! If the spot you have selected for you tree doesn’t have full sun, its unlikely that you will get a good crop of apples.
  • Pruning: Apples require yearly pruning to produce the best crop. If you love pruning, apples are a lot of fun! It’s a good idea to follow a reference, Umass and Cornell have great extension services that have excellent websites. Take a peek at  http://www.gardening.cornell.edu/fruit/homefruit/3treefruit.pdf and www.umass.edu/fruitadvisor/pdf/RINLA2011.pdf these are both great resources for apple culture.
  • Pest & Disease issues: All fruit trees are susceptible to a myriad of pests and diseases. To limit the amount of spraying needed to produce quality fruit, always plant cultivars that are touted to be resistant to those problems.
  • Pollination: Apples are not self-pollinating. This means that in order to set fruit, more than one variety must be planted that blossom at the same time. Do your research! Make sure the varieties you chose to plant overlap their bloom period, otherwise its possible neither tree will bear fruit.
  • Harvest Time: Depending on the variety, apples will ripen and can be harvested from late August all the way until frost. Consider planting varieties that will provide fruit in succession.
  • Use: Choose varieties that suit your needs. Do you like to make apple sauce and butters? ‘McIntosh’ and varieties like it are ideal for that purpose. ‘Braeburn’ makes a great pie. ‘Jonamac’ is delicious eaten out of hand. Cider is another great way to enjoy apples, try combining varieties to create a ‘House Blend’.

We stock many apples at the nursery, and are happy to source individual varieties you might be interested in. Whether a mature tree is needed for your project or a young containerized plant is ideal, we can provide a plant that will fit the need.


Myth: Drought Tolerant Plants don’t need water

MYTH: Drought tolerant plants don’t need supplemental water

TRUTH: All plants need water!

Buddleia davidii 'White Profusion'  - White Profusion Butterfly  Bush
Buddleia davidii ‘White Profusion’ – White Profusion Butterfly Bush

Drought tolerant plants are those that, once established, will survive receiving the typical (or slightly less than typical) amount of rainfall in our area without the need for supplemental irrigation.

But to be clear, surviving isn’t necessarily garden tour ready! Prolonged periods without rain force the plant to conserve water in its most important tissues. With herbaceous plants, that’s the roots. For woody plants, this also includes the framework above the ground. Plants need a lot of water to produce new growth and keep their leaves hydrated. So, during times of drought many plants will stop growing all together and begin to shed leaves. Some plants will go completely dormant, and appear like they normally do in winter, with no sign of life at all above the ground.

In order to keep your plants looking their best, it’s a good idea to give them a deep soaking if it seems dryer than normal.

Keep in mind, plants that are considered drought tolerant generally have very extensive root systems, or a long taproot. When plants fresh from the nursery are put into the ground, they don’t have those roots yet to help them pull in moisture. We recommend keeping the area around new plants consistently moist (not soaking) for at least the first two weeks after planting. This give the plant time to send out new roots into the surrounding soil. After the first two weeks, monitor the soil in the bed. If there isn’t enough rain to keep the soil damp down a few inches, water weekly.


Spring Vegetables

Lettuce 'Red Salad Bowl'
Lettuce ‘Red Salad Bowl’

There are many vegetables that can be grown and harvested this time of year.  Leafy greens like Spinach and Lettuce are both beautiful and delicious.  Cole crops like Broccoli, Cauliflower, Cabbage, Brussels sprouts and Chard are extremely satisfying to grow, as they mature quickly


Berry Patch

HIghbush blueberry flowers

Can there be anything better than eating a plump berry at it’s peak?   Supermarket fruit can’t compare to ripe berries picked and eaten out of hand.  No wonder more and more people are growing their own!

Most berry bushes require no more care than landscape shrubs.  Apart from annual pruning, there is not much in the way of work to be done to keep them productive.  Just plant them in full sun, and plan on a bountiful harvest this summer!

We have both high and lowbush blueberries in stock and are expecting some 5-6′ Highbush Blueberry ‘Elliot’ next week.  This late variety is a vigorous plant that performs very well in our climate, while producing a heavy crop of berries.   We also have a wide aray of Raspberries, Blackberries, and Gooseberries for you to choose from, that will provide you with the highest quality fruit for years to come.


Pruning Blackberries and Raspberries

Blackberry leaves

In the rose family, the genus Rubus includes cultivated red, golden, purple  and black rapsberries as well as blackberries.  Homeowners and landscapers alike can be confused about pruning these berries.

Consider growing these plants on a wire trellis system to promote good air flow  and facilitate training.

Blackberries grow long arching canes that are often very lengthy and thorny.  The fruit is borne on canes that are more than one year old.   However, the most productive canes are not older than three years.  In March, remove the oldest canes at ground level, in favor of the younger ones.   Cut back any lateral brances to six or eight inches.    Head back canes to 6″ above the top wire.  In summer, tip back new growth to 6″ above the top wire to encourage lateral fruiting branches.

Raspberries produce upright canes that are generally shorter than blackberries.  Most types of raspberries are summer-fruiting.  The fruit is borne on canes that have overwintered from the previous season.  These second-year canes will flower, fruit and then die back to the ground.  In March, remove any dead, damaged or spindly canes at ground level.

Some raspberries are fall-fruiting.  These types produce canes that will flower and fruit at the top part of the cane in the first growing season.  Over the winter they will die back somewhat, but will then flower and fruit on the lower cane portion in summer.  After this second fruiting, the entire cane will die.  The best way to maintain these types is to mow all canes to ground level in March.  This will produce a single crop in the fall.